How to Implement Foxit PDF SDK for iOS using Xamarin
Contents
Implement Foxit PDF SDK for iOS using Xamarin
Xamarin is a cross-platform development framework for building native apps using a shared C# codebase. We provide separate bindings for Android and iOS (‘foxit_xamarin_android’ and ‘foxit_xamarin_ios’) for developers to seamlessly integrate powerful PDF functionality of Foxit PDF SDK into their Xamarin apps.
This section will help you get started with Foxit PDF SDK for iOS and the Xamarin framework.
System Requirements
- Visual Studio 2017 for Mac
- Xcode 10.1
- MacOS 10.13.6 or higher
- iOS 9 or higher
- Foxit PDF SDK for iOS
Note: The version of Foxit PDF SDK for iOS should match the version of the ‘foxit_xamarin_ios‘ that you choose and download, or the version that you install from the NuGet.
Install Xamarin on Visual Studio 2017 for Mac
Please refer to the official installation instructions to install Xamarin in Visual Studio 2017 for Mac.
Integrate Foxit PDF SDK into your Xamarin project
There are two ways to integrate Foxit PDF SDK into your Xamarin project:
- Integrate with NuGet (supported from version 6.3)
- Integrate manually by building and referencing DLLs
Integrate with NuGet
It is now possible to integrate Foxit PDF SDK into your Xamarin project through NuGet packages, which is much easier than the second way “Integrate manually by building and referencing DLLs”, and can save you much time.
To integrate Foxit PDF SDK into your Xamarin project through Nuget packages, please follow the steps below:
1) In the Solution, right-click the Packages node of your project, and click Add Packages… as shown in Figure 1-1.
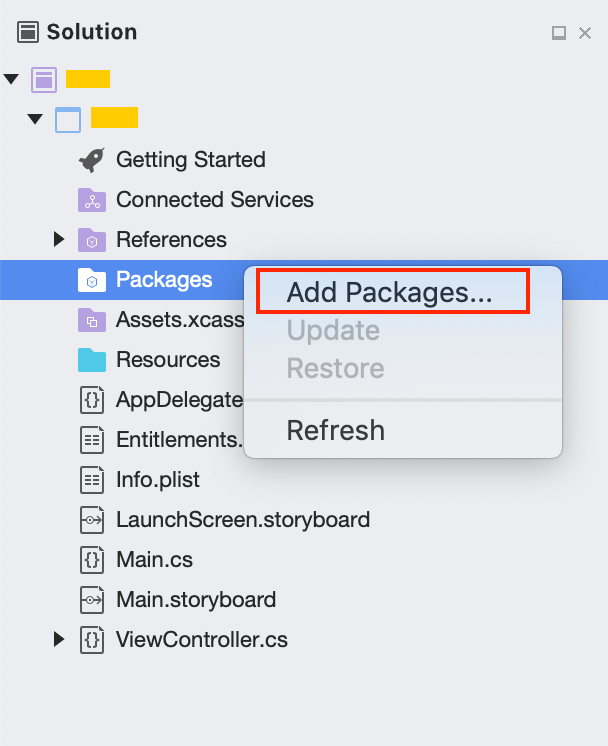
Figure 1-1
2) In the Add Packages window, search for Foxit.iOS and Foxit.iOS.UIExtensions (See Figure 1-2), and click Add Packages to install the two packages.
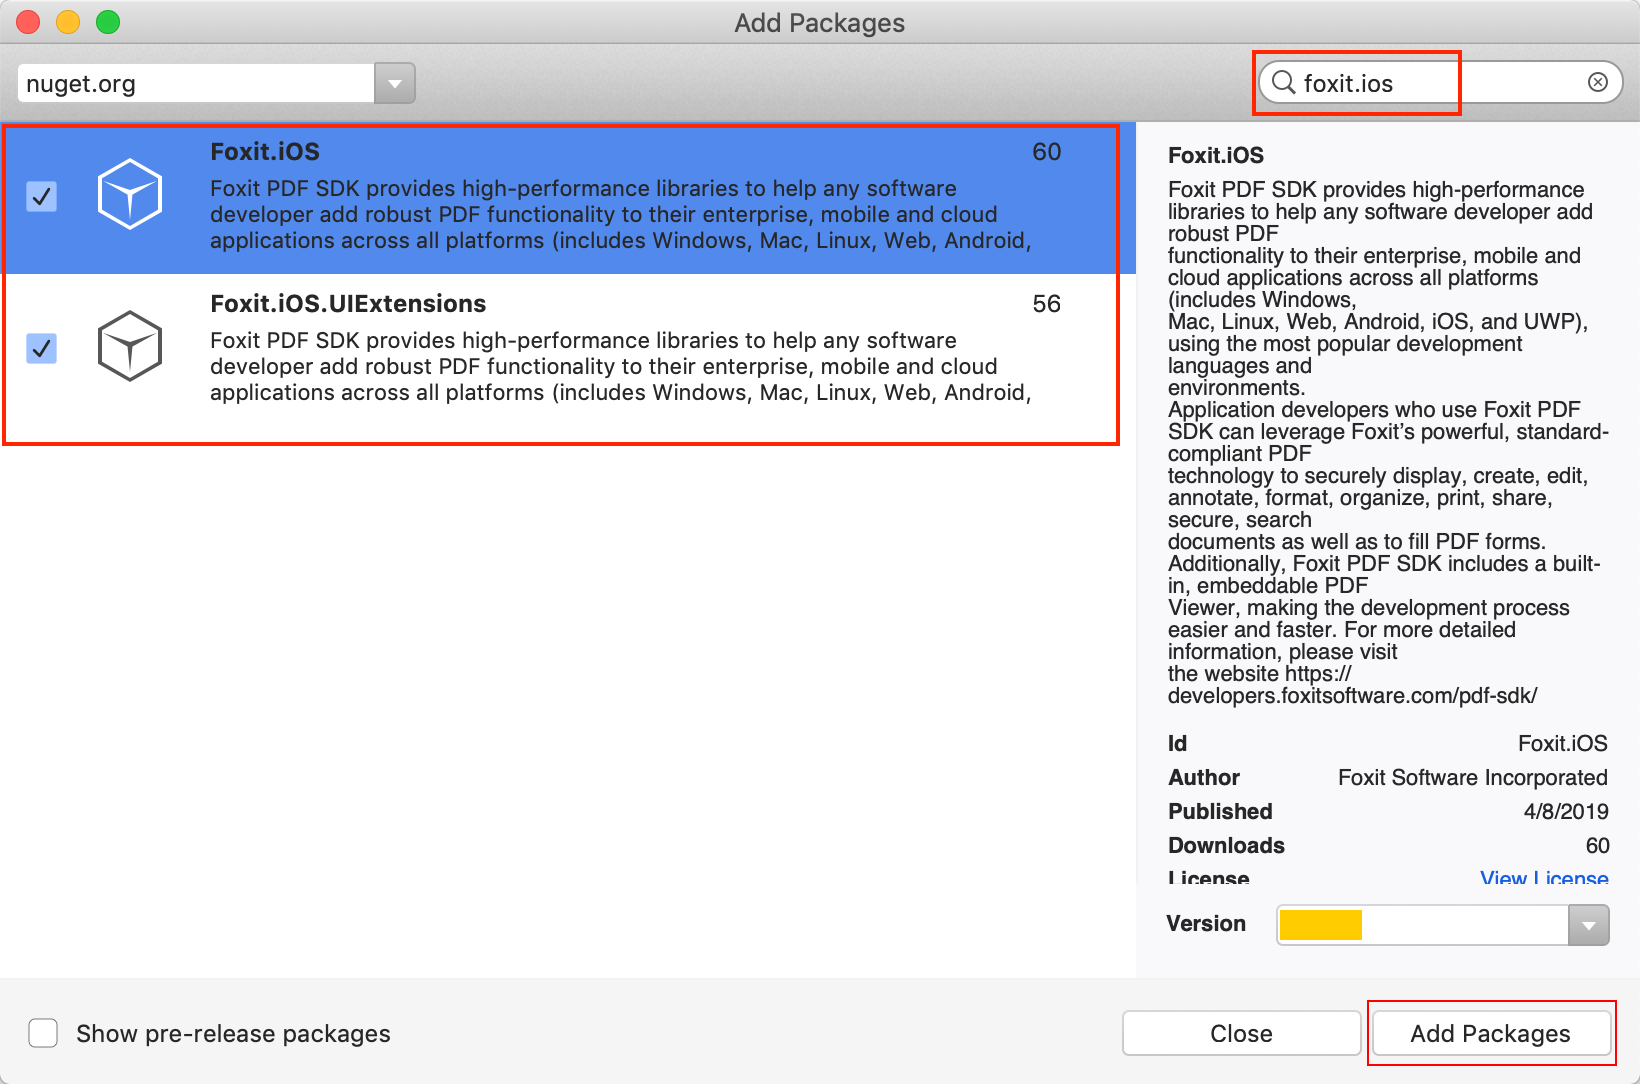
Figure 1-2
After finishing the above installation, the Packages of your project will look like Figure 1-3.
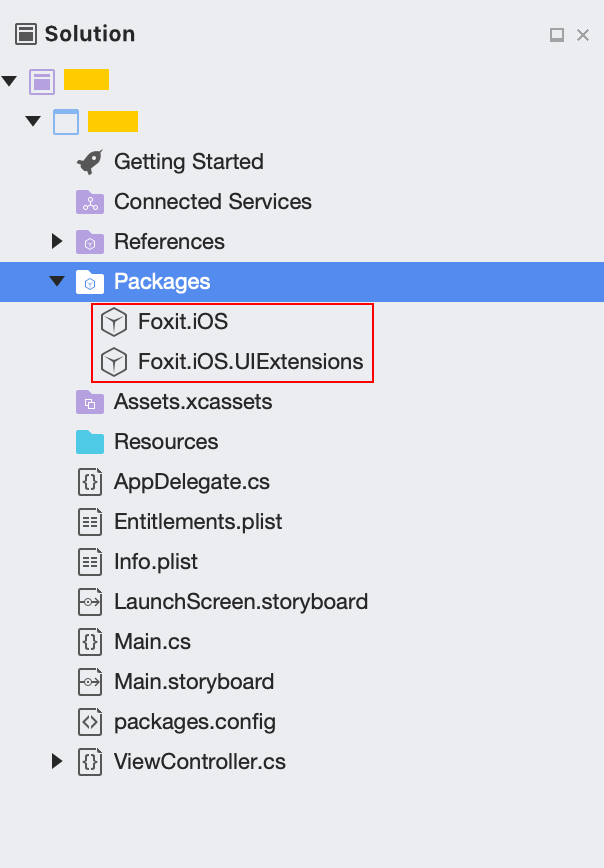
Figure 1-3
Integrate manually by building and referencing DLLs
To integrate manually, you should first build DLLs, and then add it as a reference to your project.
Build DLLs
Download the ‘foxit_xamarin_ios’ from GitHub. If you choose and download the version before 6.3, please follow the “The version of ‘foxit_xamarin_ios’ before 6.3”, otherwise follow the “‘foxit_xamarin_ios’ version 6.3 or higher”.
The version of ‘foxit_xamarin_ios’ before 6.3
For version before 6.3, you need to build the FoxitRDKBinding project and get the DLL, please follow the steps below:
1) Download Foxit PDF SDK for iOS package, extract it, and copy the following files (libraries and licenses) in the “libs” folder of the extracted package to “foxit_xamarin_ios/libs” directory:
FoxitRDK.framework
uiextensionsDynamic.framework
rdk_key.txt
rdk_sn.txt
2) Load FoxitRDKBinding.sln in Visual Studio 2017 for Mac. Double-click the FoxitRDKBinding.sln found in “foxit_xamarin_ios/FoxitRDKBinding“.
3) Add FoxitRDK.framework and uiextensionsDynamic.framework as native references to the FoxitRDKBingding project.
In the Solution, right-click the Native Reference node and select Add Native Reference as shown in Figure 1-4.
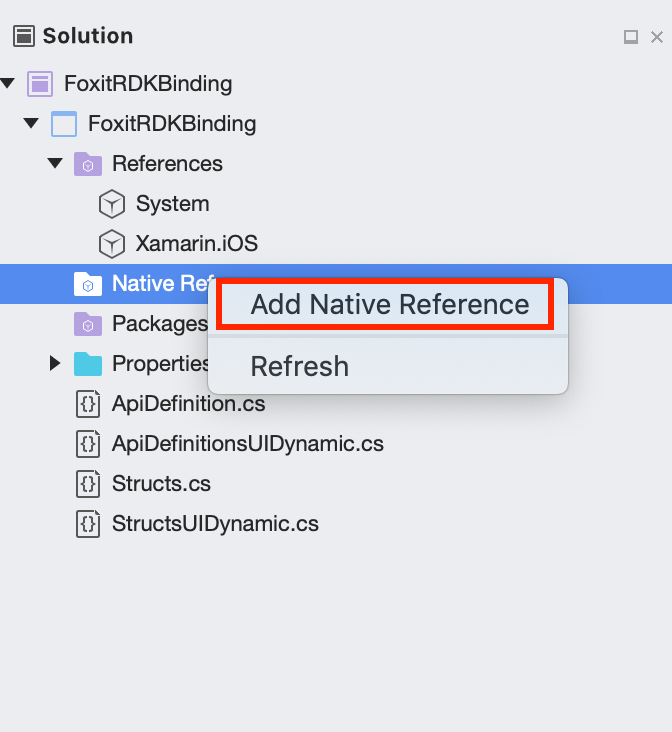
Figure 1-4
Locate to the “foxit_xamarin_ios/FoxitRDKBinding/libs”, choose FoxitRDK.framework and uiextensionsDynamic.framework as shown in Figure 1-5. Then click Open.
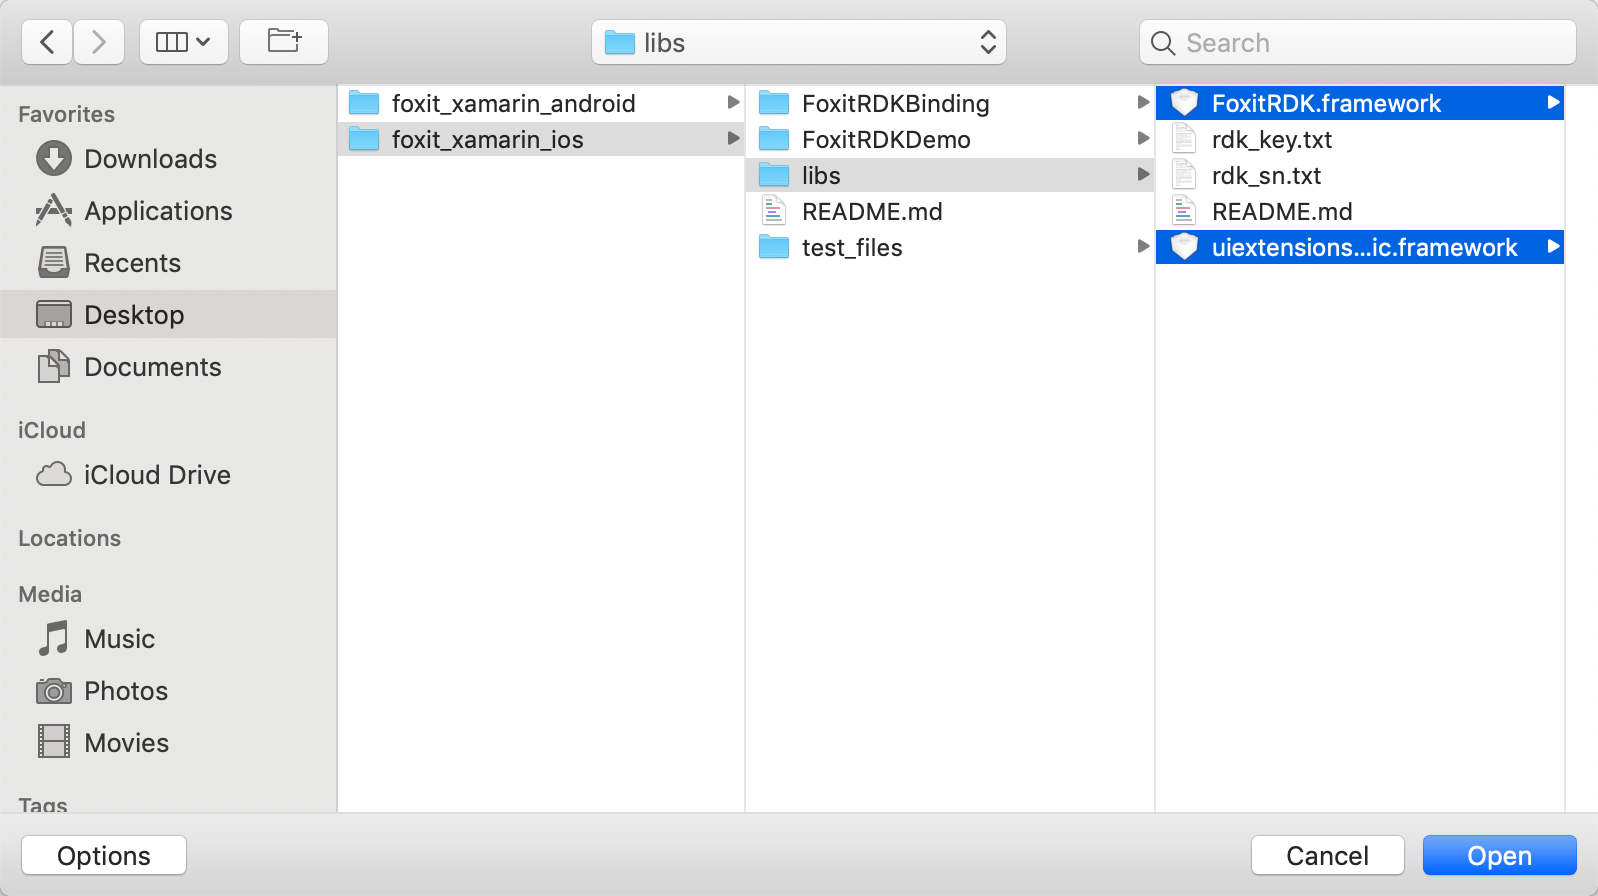
Figure 1-5
Then, the FoxitRDKBinding project will look like the Figure 1-6.
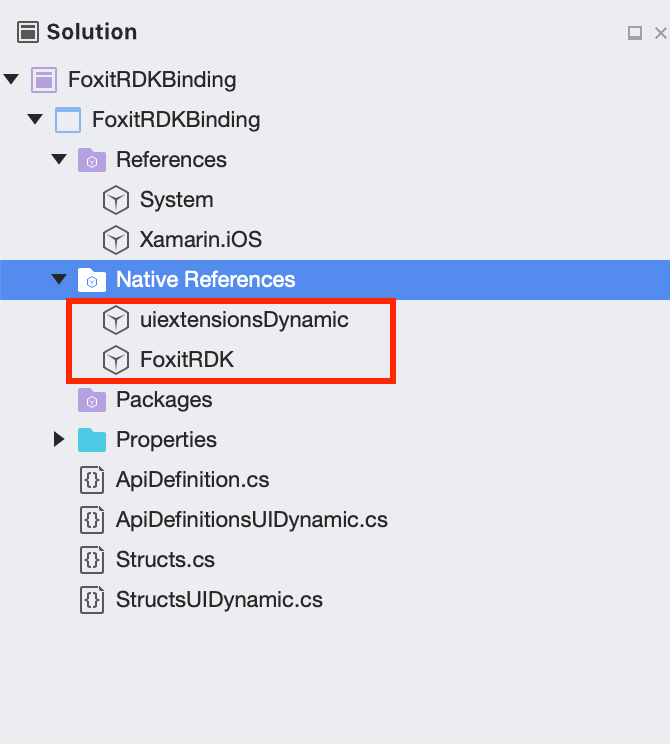
Figure 1-6
Note: If you only need to display a PDF document, adding FoxitRDK.framework is enough. uiextensionsDynamic.framework is required by the section “Build a full-featured PDF Reader“.
4) Build the FoxitRDKBinding project to get the DLL. Select Build -> Build FoxitRDKBinding, then the FoxitRDKBinding.dll will be generated in “foxit_xamarin_ios/FoxitRDKBinding/FoxitRDKBinding/bin/Debug (or release)” directory.
‘foxit_xamarin_ios’ version 6.3 or higher
For version 6.3 or higher, you should build the Foxit.iOS and Foxit.iOS.UIExtensions projects and get the DLLs, please follow the steps below:
1) Download Foxit PDF SDK for iOS package, extract it, and copy the following files (libraries and licenses) in the “libs” folder of the extracted package to “foxit_xamarin_ios/libs” directory:
FoxitRDK.framework
uiextensionsDynamic.framework
rdk_key.txt
rdk_sn.txt
2) Get Foxit.iOS.dll and Foxit.iOS.UIExtensions.dll.
Foxit.iOS.dll is the heart of the SDK including the core functionalities of Foxit PDF SDK for iOS, and Foxit.iOS.UIExtensions.dll extends more powerful PDF related features including UI and resource files.
Load Foxit.iOS.UIExtensions.sln in Visual Studio 2017 for Mac. Double-click the Foxit.iOS.UIExtensions.sln found in “foxit_xamarin_ios/Foxit.iOS.UIExtensions”. Select Build -> Build All, then the Foxit.iOS.dll and Foxit.iOS.UIExtensions.dll will be generated in “foxit_xamarin_ios/Foxit.iOS.UIExtensions/Foxit.iOS.UIExtensions/bin/Debug (or release)” directory.
Note: For getting Foxit.iOS.dll, you can build the Foxit.iOS project directly. Double-click the Foxit.iOS.sln found in “foxit_xamarin_ios/Foxit.iOS”. Select Build -> Build Foxit.iOS, then the Foxit.iOS.dll will be generated in “foxit_xamarin_ios/Foxit.iOS/Foxit.iOS/bin/Debug (or release)” directory.
Add the built DLLs as references to your project
If you use the version before 6.3, please follow the “The version of ‘foxit_xamarin_ios’ before 6.3”, otherwise follow the “‘foxit_xamarin_ios’ version 6.3 or higher”.
The version of ‘foxit_xamarin_ios’ before 6.3
For version before 6.3, please follow the steps below to add FoxitRDKBinding.dll as a reference to your project. We assume that you have got the FoxitRDKBinding.dll, if not, please refer to Build DLLs (The version of ‘foxit_xamarin_ios’ before 6.3) section to build the FoxitRDKBinding project and generate the FoxitRDKBinding.dll.
1) In the Solution, right-click the References node and select Edit References… as shown in Figure 1-7.
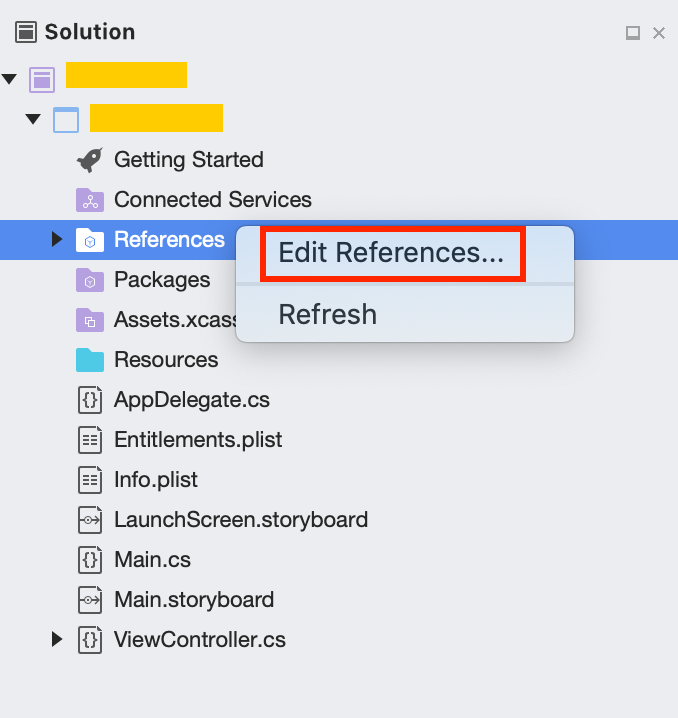
Figure 1-7
2) In the Edit References dialog, click Browse… (See Figure 1-8) to find the FoxitRDKBinding.dll (in the “foxit_xamarin_ios/FoxitRDKBinding/FoxitRDKBinding/bin/Debug (or release)” folder), select it and then click Add, which is shown in Figure 1-9.
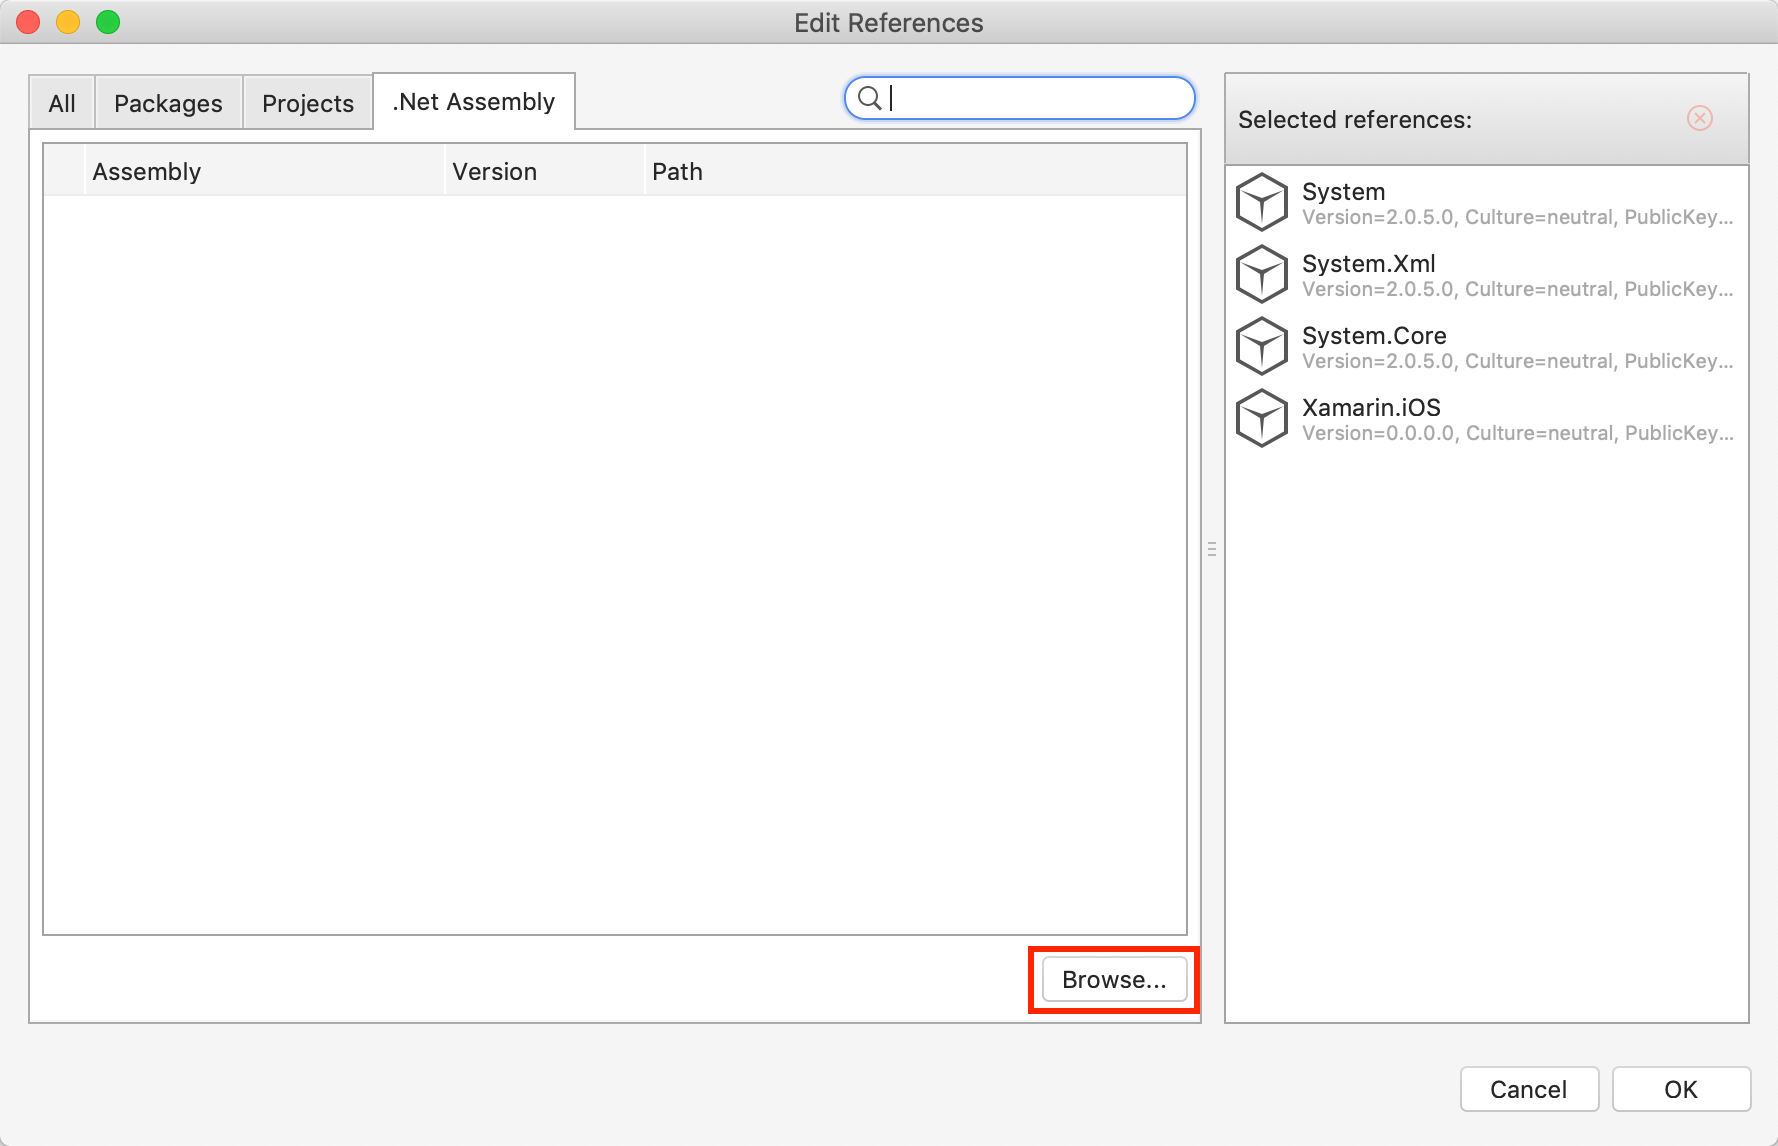
Figure 1-8
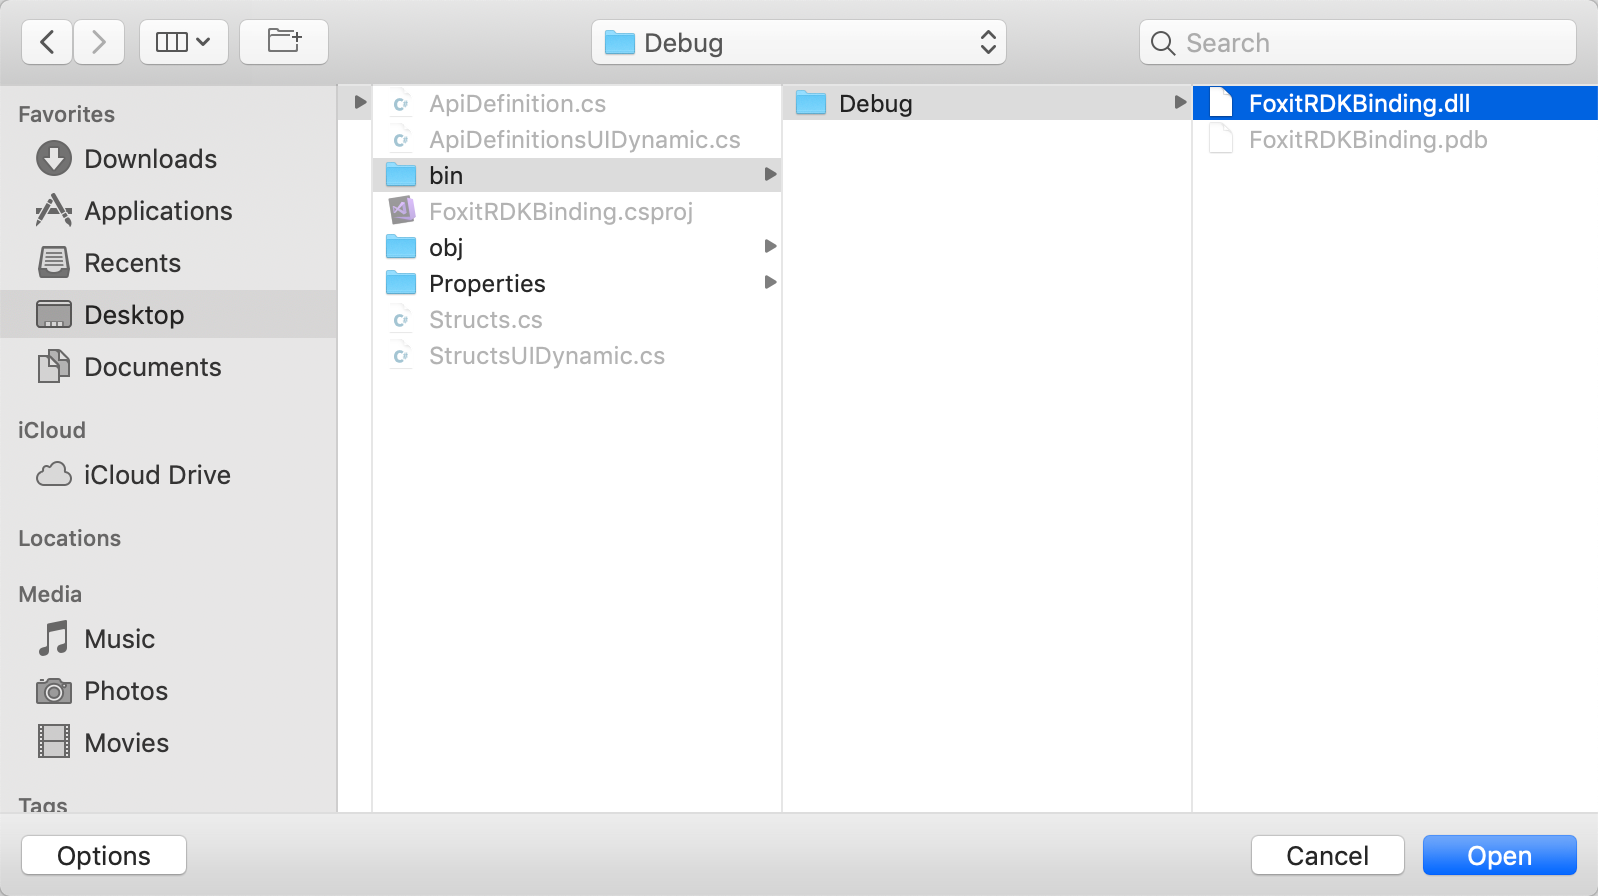
Figure 1-9
Then, the FoxitRDKBinding.dll will appear in the list and has already been checked (See Figure 1-10). Click OK.
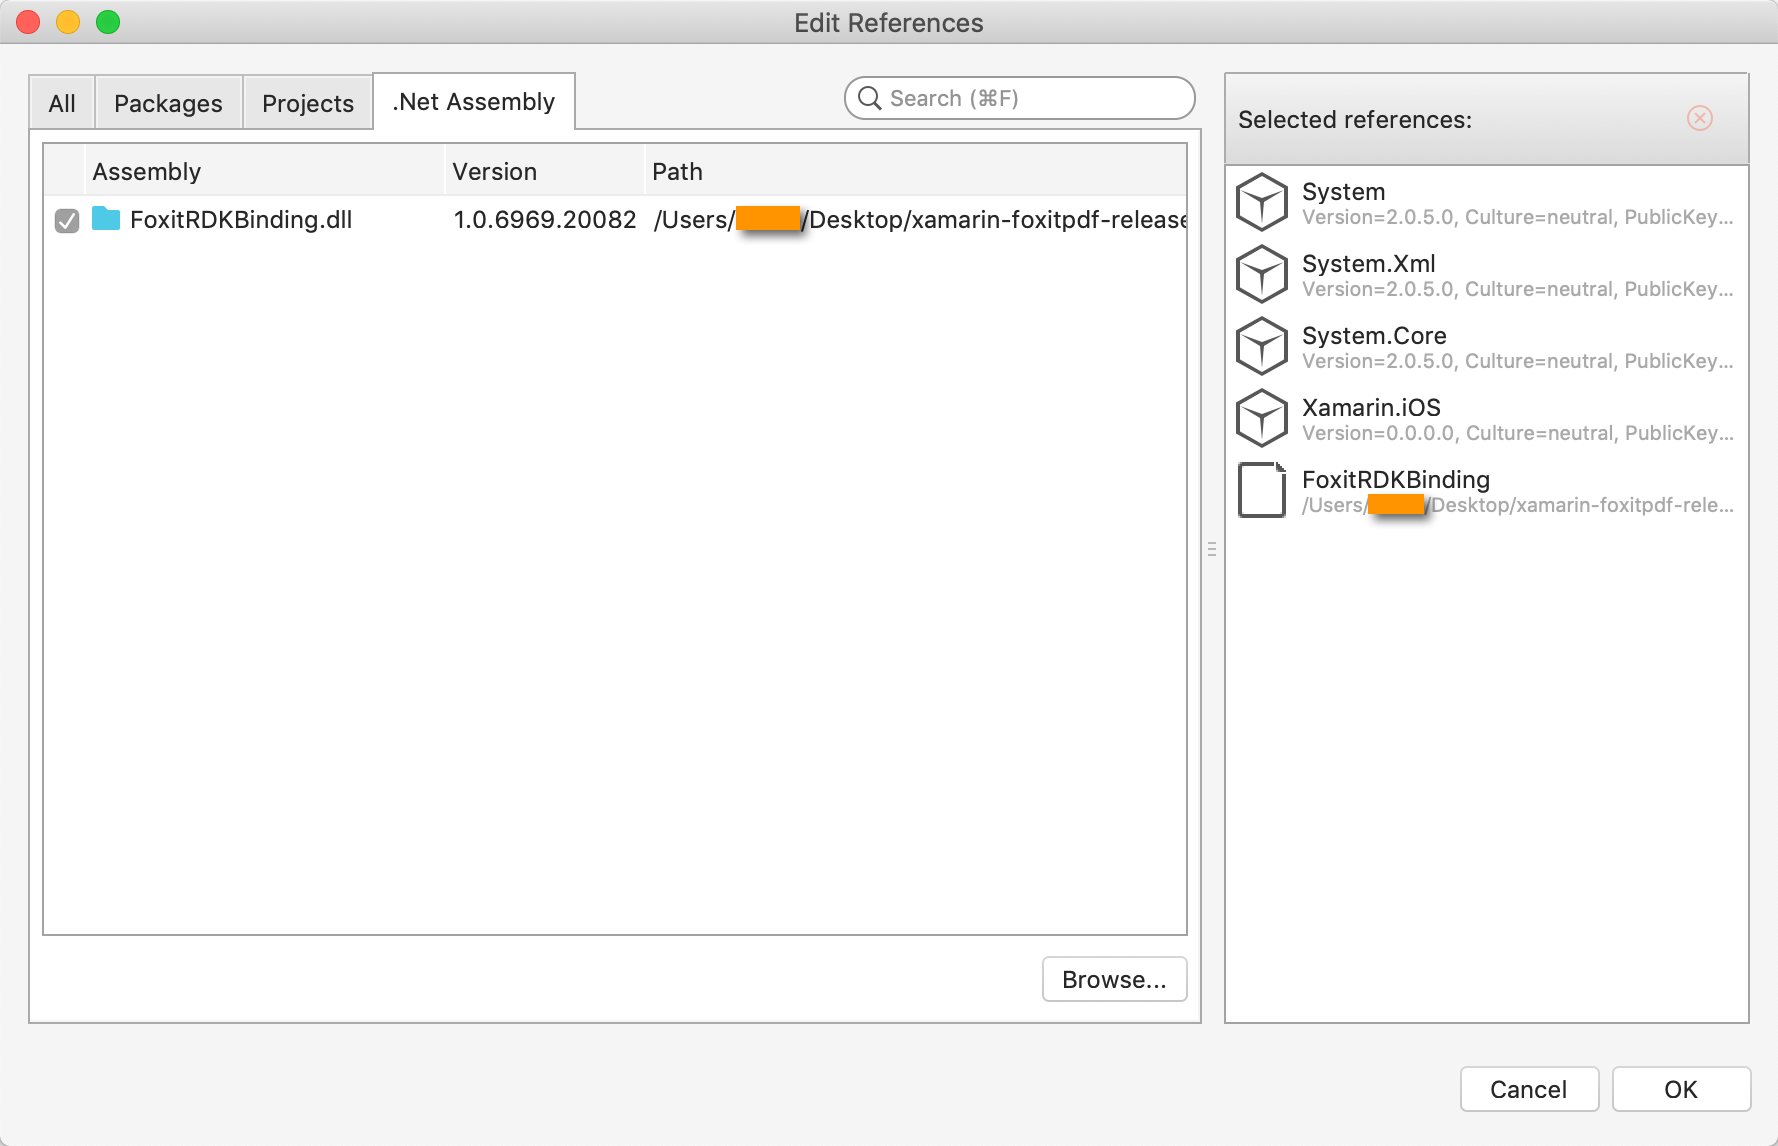
Figure 1-10
3) After finishing the above steps, the References of your project will look like the Figure 1-11.
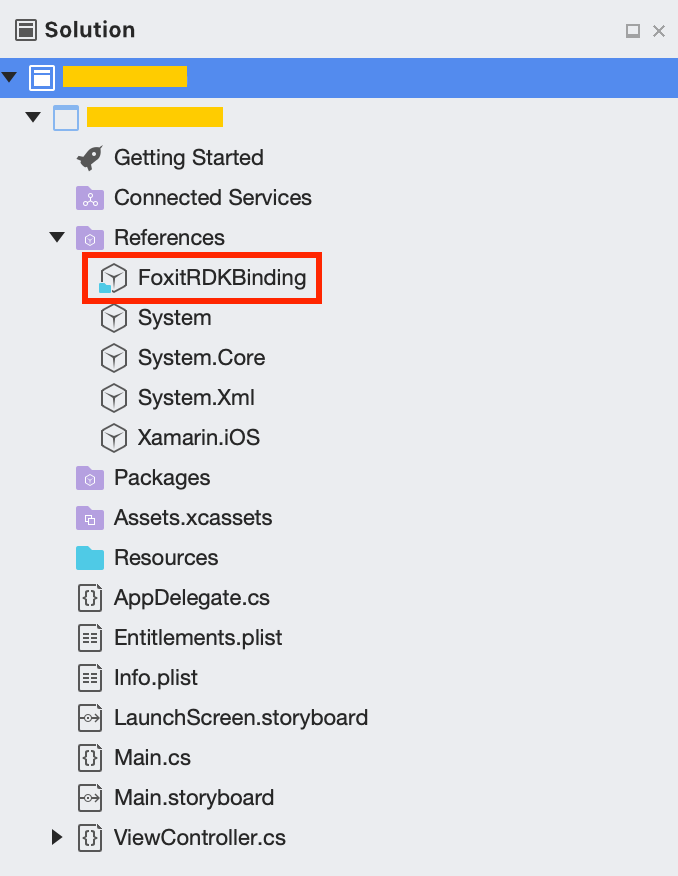
Figure 1-11
‘foxit_xamarin_ios’ version 6.3 or higher
For version 6.3 or higher, you need to add the Foxit.iOS.dll and Foxit.iOS.UIExtensions.dll as references to your project. We assume that you have got the two DLLs, if not, please refer to Build DLLs (‘foxit_xamarin_ios’ version 6.3 or higher) section to build the Foxit.iOS and Foxit.iOS.UIExtensions projects and generate the Foxit.iOS.dll and Foxit.iOS.UIExtensions.dll.
Please refer to the steps outlined in the “Add the built DLLs as reference to your project (The version of ‘foxit_xamarin_ios’ before 6.3)” to add the Foxit.iOS.dll and Foxit.iOS.UIExtensions.dll as references to your project. After finishing, the References of your project will look like the Figure 1 11.
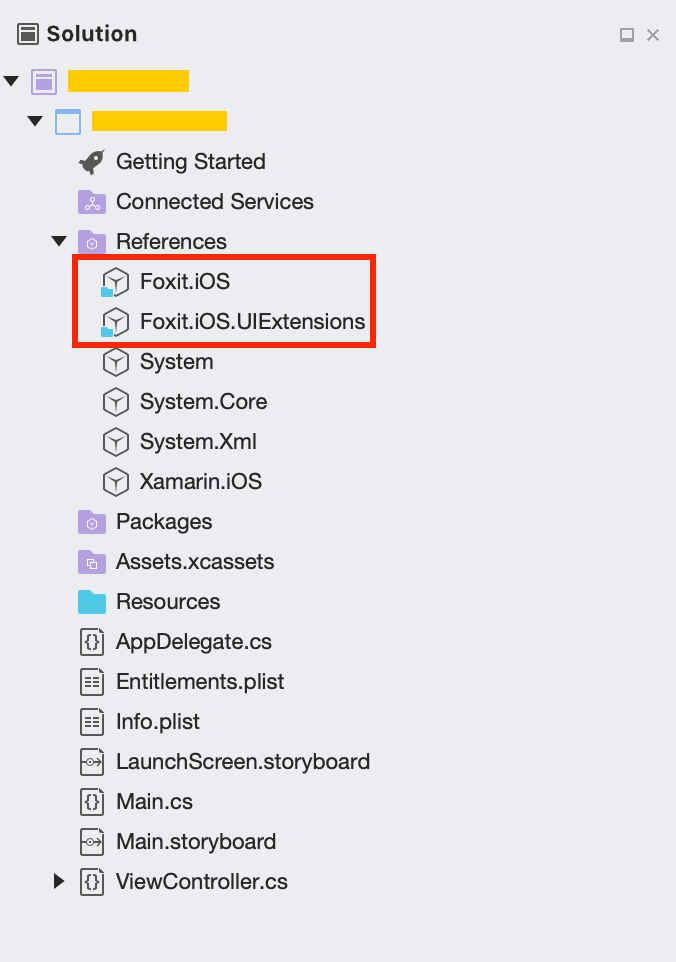
Figure 1-12
Note: When building the necessary libraries and resource files for your Xamarin project, please make sure to use the same environment and machine where your project is being developed, and avoid copying and pasting your DLLs on different machines or environments such as Windows to Mac or Linux and vice-versa. Although the DLLs are perfectly functional on testing environment, they can cause issues with the signing code when you publish your application.
Build a Xamarin iOS project using Foxit PDF SDK for iOS
This section will help you to quickly build a full-featured PDF Reader in Xamarin iOS platform with step-by-step instructions provided.
Create a new Xamarin iOS project
Open Visual Studio 2017 for Mac, choose File -> New Solution…, and then select iOS -> App -> Single View App as shown in Figure 1-13. Then, click Next.
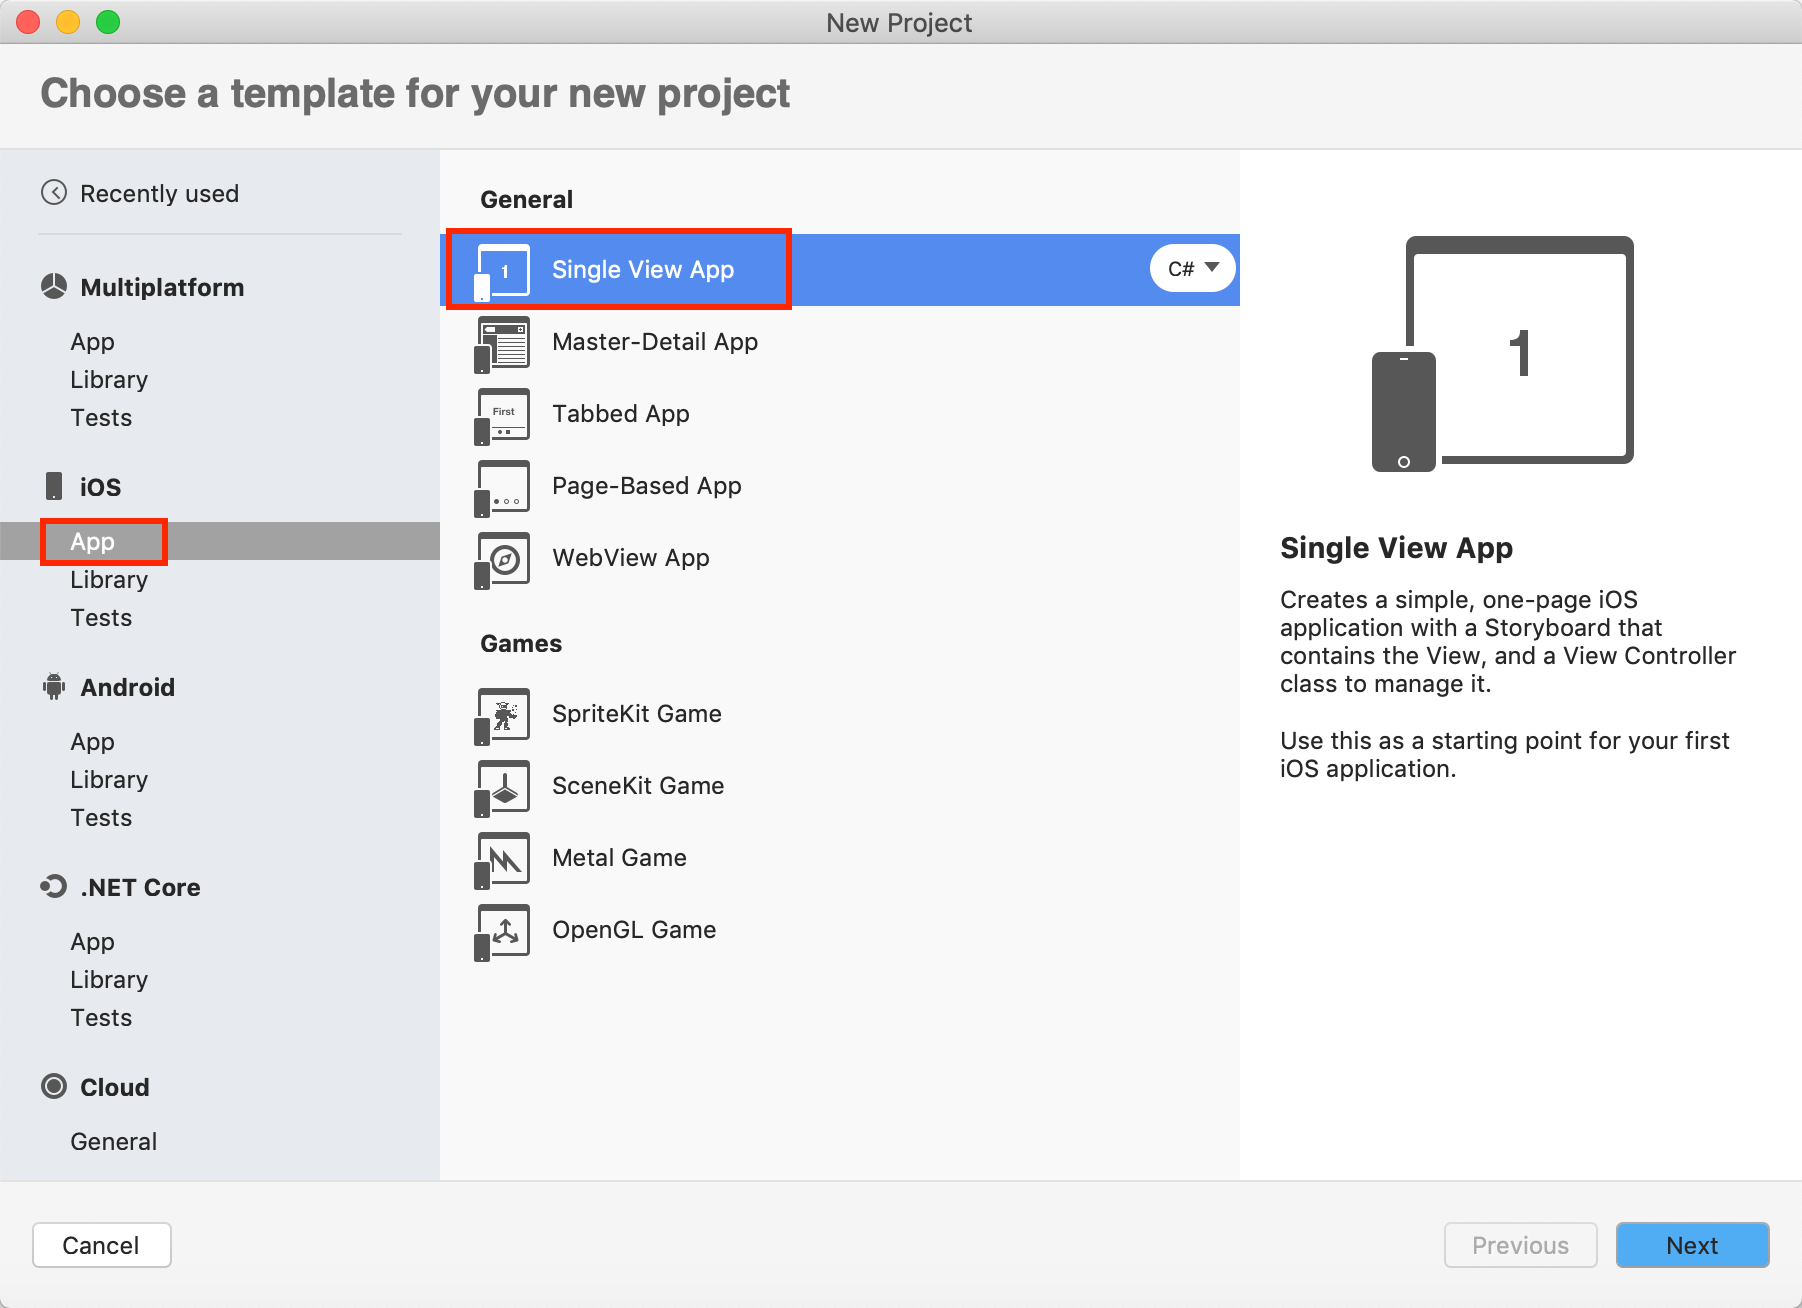
Figure 1-13
In the Configure your iOS app dialog, set the options for your new project as desired. For example, we set the APP Name to “TestXamarin” and the Organization Identifier to “com.foxit” as shown in Figure 1-14. Then, click Next.
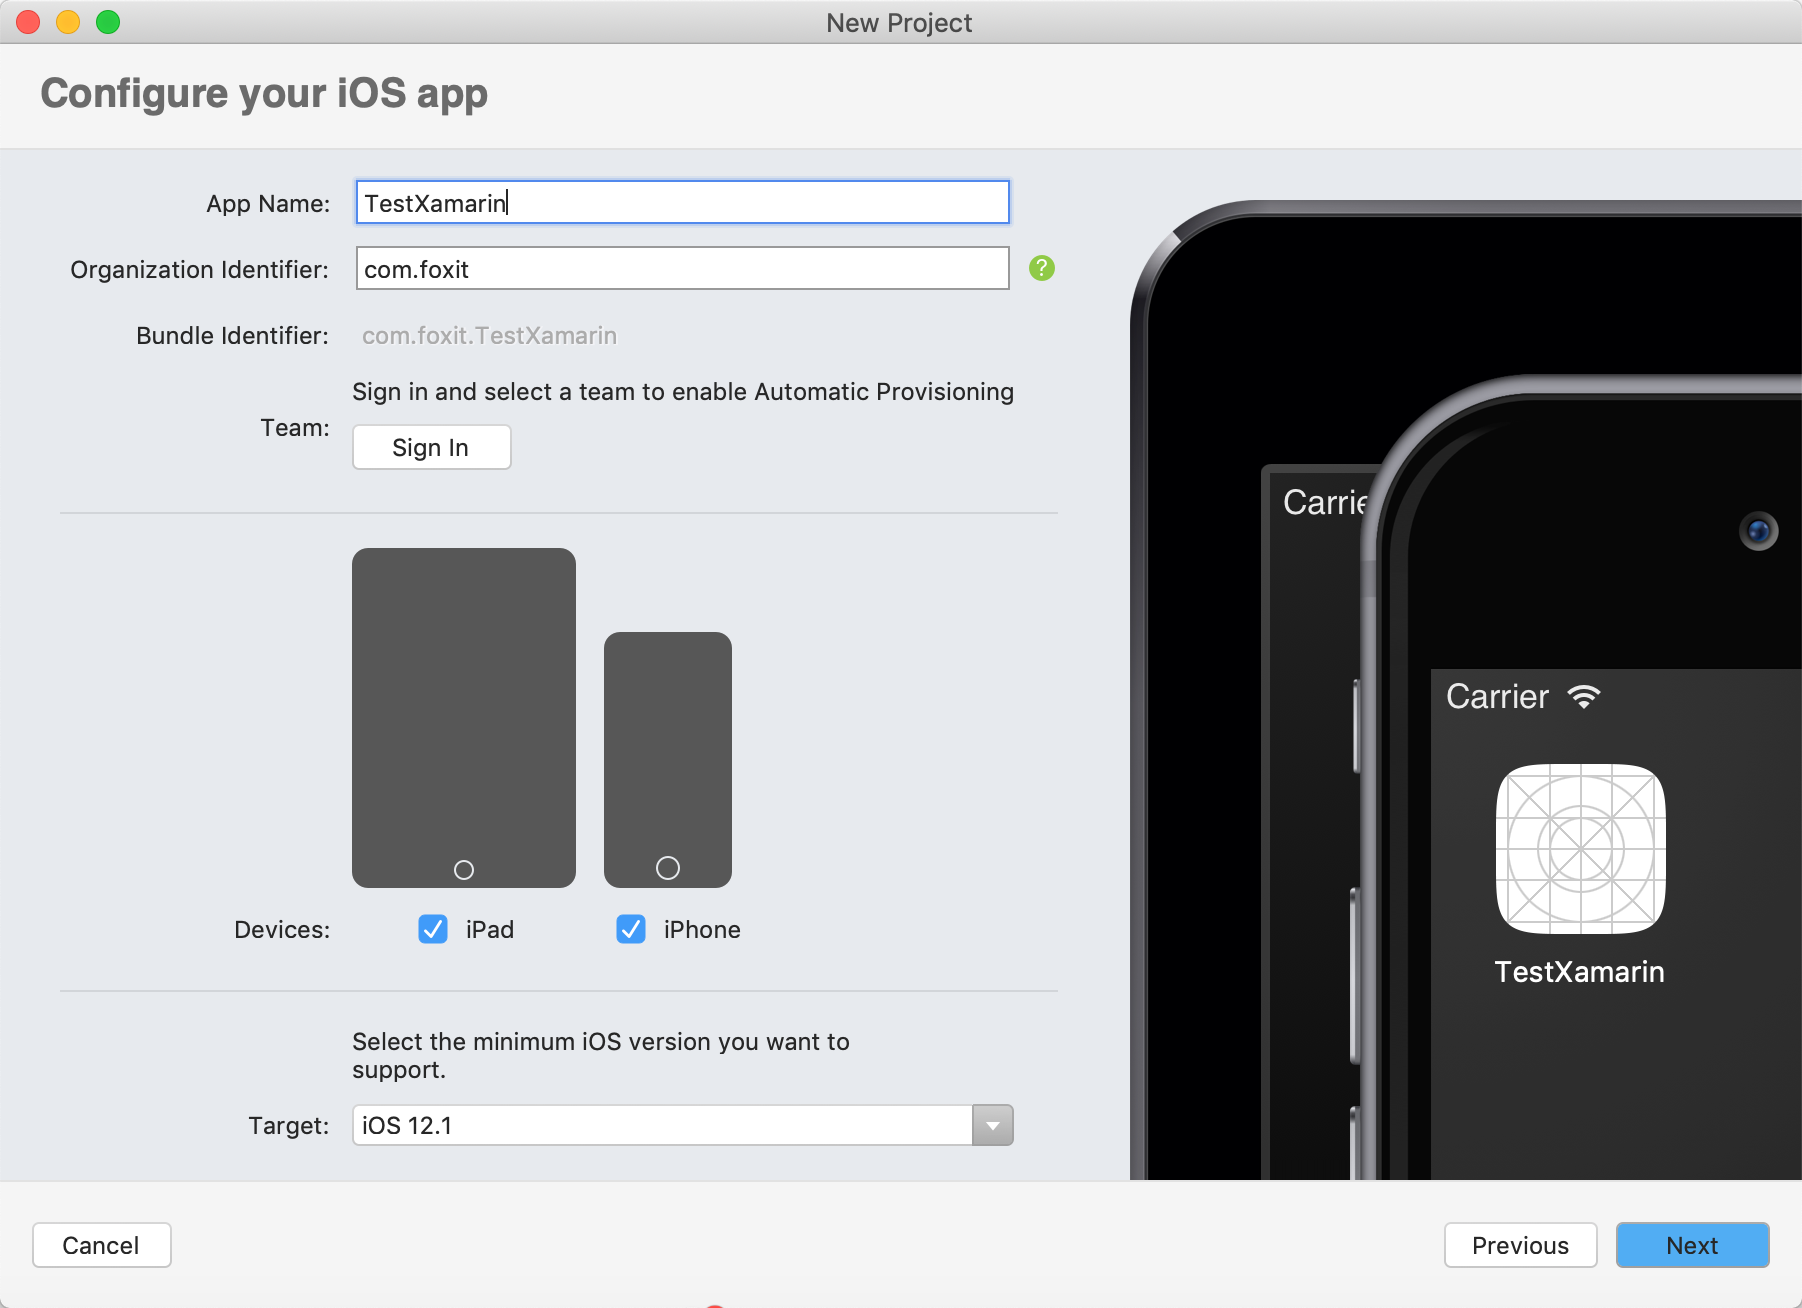
Figure 1-14
Choose the location where the project places to. For example, we place the project on the Desktop as shown in Figure 1-15. Click Create.
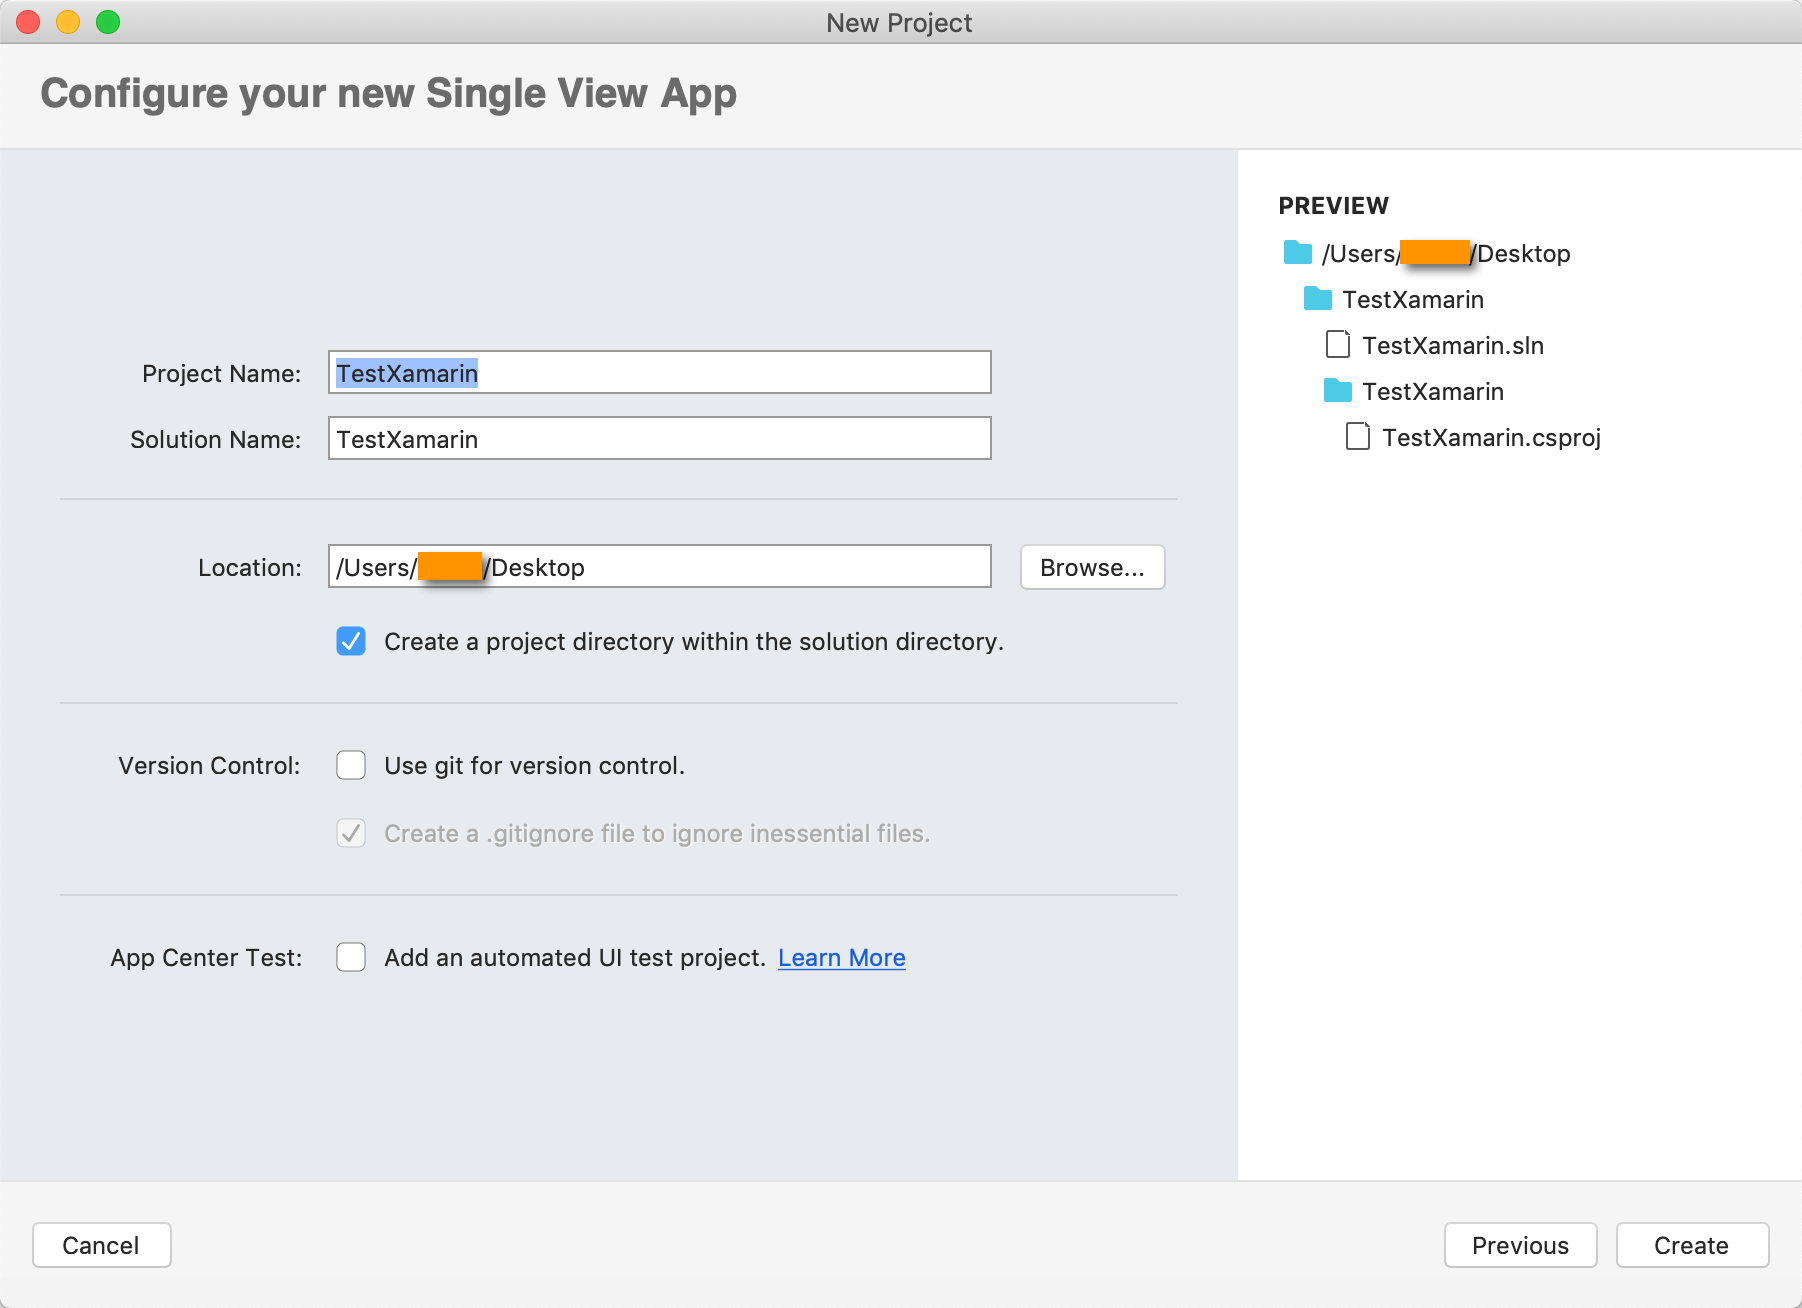
Figure 1-15
Integrate Foxit PDF SDK into the project
Please refer to “Integrate Foxit PDF SDK into your Xamarin project” to integrate the Foxit PDF SDK into the created project. We recommend using the first way “Integrate with NuGet”, which is more easy and convenient.
Initialize Foxit SDK Library
Before calling any APIs, you must first initialize Foxit SDK library by using the function FSLibrary::Initialize. Finish the initialization in the FinishedLaunching method within the AppDelegate.cs file (See Figure 1-16).
using Foundation;
using UIKit;
using Foxit.iOS;

namespace TestXamarin
{
    // The UIApplicationDelegate for the application. This class is responsible for launching the
    // User Interface of the application, as well as listening (and optionally responding) to application events from iOS.
    [Register("AppDelegate")]
    public class AppDelegate : UIApplicationDelegate
    {
        // class-level declarations

        public override UIWindow Window
        {
            get;
            set;
        }

        public override bool FinishedLaunching(UIApplication application, NSDictionary launchOptions)
        {
            // Override point for customization after application launch.
            // If not required for your application you can safely delete this method

            // The value of "sn" can be found in the "rdk_sn.txt".
            // The value of "key" can be found in the "rdk_key.txt".
            string sn = "xxx";
            string key = "xxx";

            // Initialize the Foxit SDK library.
            var errCode = FSLibrary.Initialize(sn, key);
            if (errCode != FSErrorCode.Success)
                return false;

            return true;
        }


}
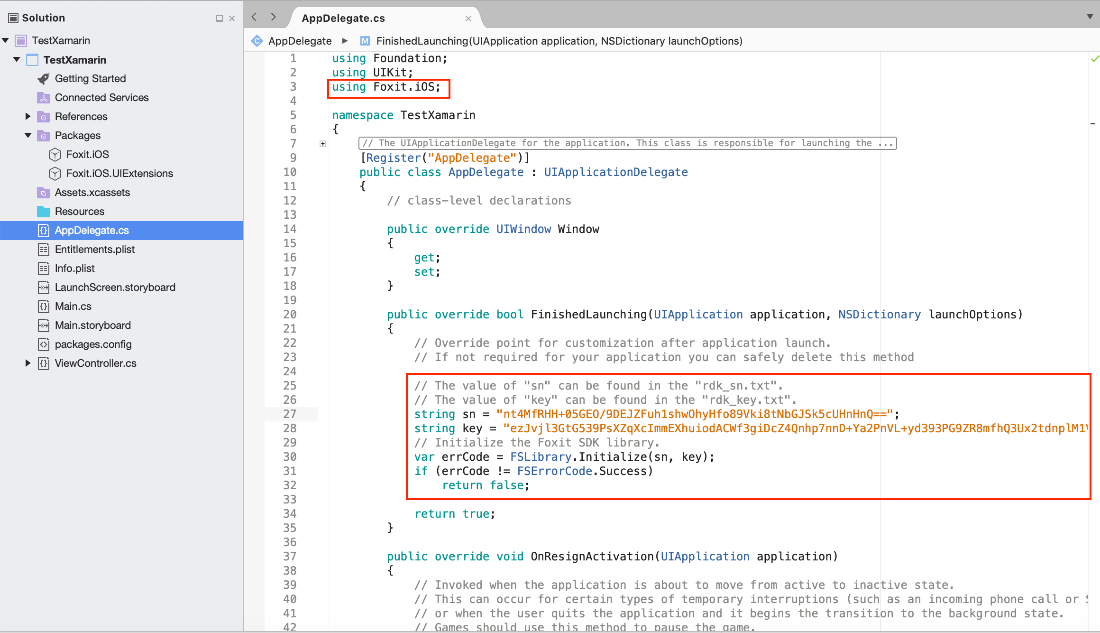
Figure 1-16
Note: The value of “sn” can be found in the “rdk_sn.txt” (the string after “SN=”) and the value of “key” can be found in the “rdk_key.txt” (the string after “Sign=”). The trial license files (rdk_sn.txt and rdk_key.txt) can be found in the “foxit_xamarin_ios/libs” folder or in the “libs” folder of Foxit PDF SDK for iOS package.
Display a PDF document using PDFViewCtrl
To display a PDF document, please first add a PDF document to the project’s Resources which will be used as the test file.
In the Solution, right-click the Resources, select Add -> Add Files…, find the PDF document as you wish. For example, the “complete_pdf_viewer_guide_ios.pdf” under the “samples/test_files” folder of the Foxit PDF SDK for iOS package. After adding, you can see the PDF as shown in Figure 1-17.
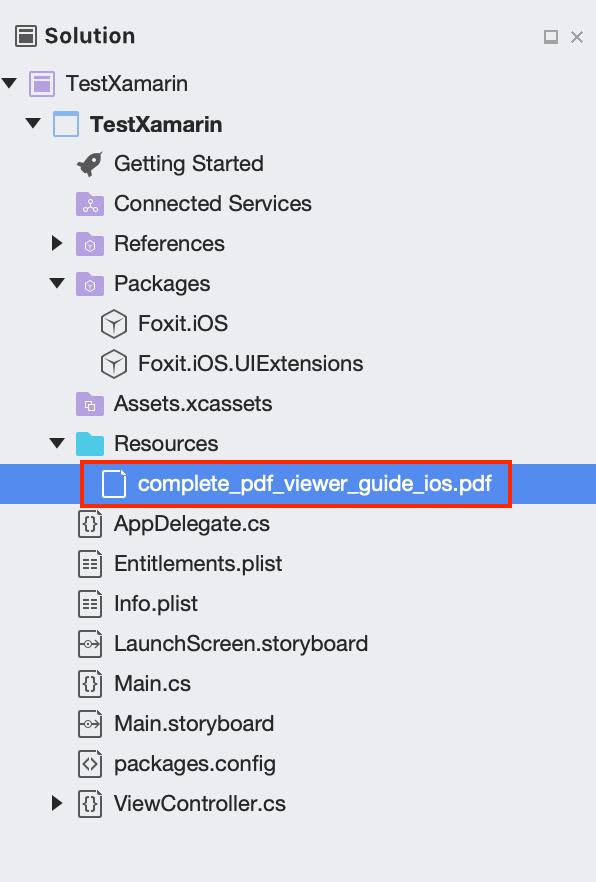
Figure 1-17
Then, add the following code to ViewController.cs to display a PDF document. It’s really easy to present a PDF on screen. All you need is to get a PDF file, instantiate a FSPDFViewCtrl object and call FSPDFViewCtrl::OpenDoc function to open and render the PDF document.
Update ViewController.cs as follows:
using System;

using UIKit;
using Foundation;
using Foxit.iOS;

namespace TestXamarin
{
    public partial class ViewController : UIViewController
    {
        private FSPDFViewCtrl pdfViewCtrl;

        protected ViewController(IntPtr handle) : base(handle)
        {
            // Note: this .ctor should not contain any initialization logic.
        }

        public override void ViewDidLoad()
        {
            base.ViewDidLoad();

            // Instantiate a PDFViewCtrl object.
            pdfViewCtrl = new FSPDFViewCtrl(new CoreGraphics.CGRect(0, 0, View.Frame.Size.Width, View.Frame.Size.Height));

            // Open a PDF document.
            string path = NSBundle.MainBundle.PathForResource("complete_pdf_viewer_guide_ios", "pdf");
            pdfViewCtrl.OpenDoc(path, null, null);

            // Add the pdfViewCtrl to the root view.
            View.AddSubview(pdfViewCtrl);

        }

        public override void DidReceiveMemoryWarning()
        {
            base.DidReceiveMemoryWarning();
            // Release any cached data, images, etc that aren't in use.
        }
    }
}
In this chapter, we build and run the project on an iPhone 8 Simulator. After building the project, you will see that the “complete_pdf_viewer_guide_ios.pdf” document is displayed as shown in Figure 1-18. Now, this sample app has some basic PDF features, such as zooming in/out and page turning.

Figure 1-18
Build a full-featured PDF Reader
To build a full-featured PDF reader, all you need to do is to instantiate a UIExtensionsManager object, and then set it to FSPDFViewCtrl.
using Foxit.iOS.UIExtensions;
...
private UIExtensionsManager uiExtensionsManager;
...
// Instantiate a UIExtensionsManager object and set it to pdfViewCtrl.
uiExtensionsManager = new UIExtensionsManager(pdfViewCtrl);
pdfViewCtrl.ExtensionsManager = uiExtensionsManager;
The whole update of ViewController.cs is as follows:
using System;

using UIKit;
using Foundation;
using Foxit.iOS;
using Foxit.iOS.UIExtensions;

namespace TestXamarin
{
    public partial class ViewController : UIViewController
    {
        private FSPDFViewCtrl pdfViewCtrl;
        private UIExtensionsManager uiExtensionsManager;

        protected ViewController(IntPtr handle) : base(handle)
        {
            // Note: this .ctor should not contain any initialization logic.
        }

        public override void ViewDidLoad()
        {
            base.ViewDidLoad();

            // Instantiate a PDFViewCtrl object.
            pdfViewCtrl = new FSPDFViewCtrl(new CoreGraphics.CGRect(0, 0, View.Frame.Size.Width, View.Frame.Size.Height));

            // Open a PDF document.
            string path = NSBundle.MainBundle.PathForResource("complete_pdf_viewer_guide_ios", "pdf");
            pdfViewCtrl.OpenDoc(path, null, null);

            // Add the pdfViewCtrl to the root view.
            View.AddSubview(pdfViewCtrl);

            // Instantiate a UIExtensionsManager object and set it to pdfViewCtrl.
            uiExtensionsManager = new UIExtensionsManager(pdfViewCtrl);
            pdfViewCtrl.ExtensionsManager = uiExtensionsManager;

        }

        public override void DidReceiveMemoryWarning()
        {
            base.DidReceiveMemoryWarning();
            // Release any cached data, images, etc that aren't in use.
        }
    }
}
Add permissions to access camera, microphone and photo library
In order to access the camera, microphone and photo library, you need to add the permission configuration in the “Info.plist” as shown in Figure 1-19.

Figure 1-19
Run the project
After building the project, you will see that the “complete_pdf_viewer_guide_ios.pdf” document is displayed as shown in Figure 1-20. Now, it is a full-featured PDF Reader which includes all the features in Foxit PDF SDK for iOS and it also supports to open a RMS protected document.
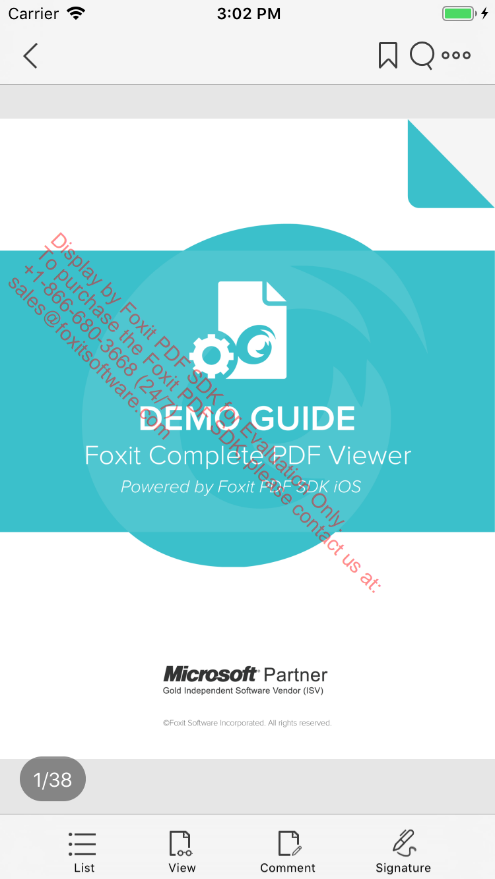
Figure 1-20
Customize the UI
For how to customize the UI in your Xamarin iOS project, you can refer to the “Customizing User Interface” section of the Developer Guide for Foxit PDF SDK for iOS.
Updated on February 15, 2019