How to build a PDF library with React
React is a popular JavaScript library for building user interfaces. It allows developers to build encapsulated user interface components. More importantly, React manages the state of each component instance. The end result is clean code with less maintenance effort. An experienced developer may only need to spend a day reading the React tutorial and start building React applications.
In this article, we are going to use React to build a PDF document library using two React components: a File Manager and a PDF viewer. You can use the resulting web application to easily share a large number of PDF files categorized in folders and subfolders on the server. On the other hand, end users can easily browse through the folders and decide to view selected PDF file without leaving the page or having to wait for the complete PDF file to download. This is achieved by using Foxit’s JavaScript PDF Library which is freely available to download.
This article was written with the following tools:
- Microsoft Visual Studio 2019 (can be replaced with any text/code editor)
- Foxit PDF SDK for Web 7.2
- React
- Node.js
- npm
Follow the below steps to implement the React PDF Document Library in minutes.
A. PDF Web Viewer (and Editor)
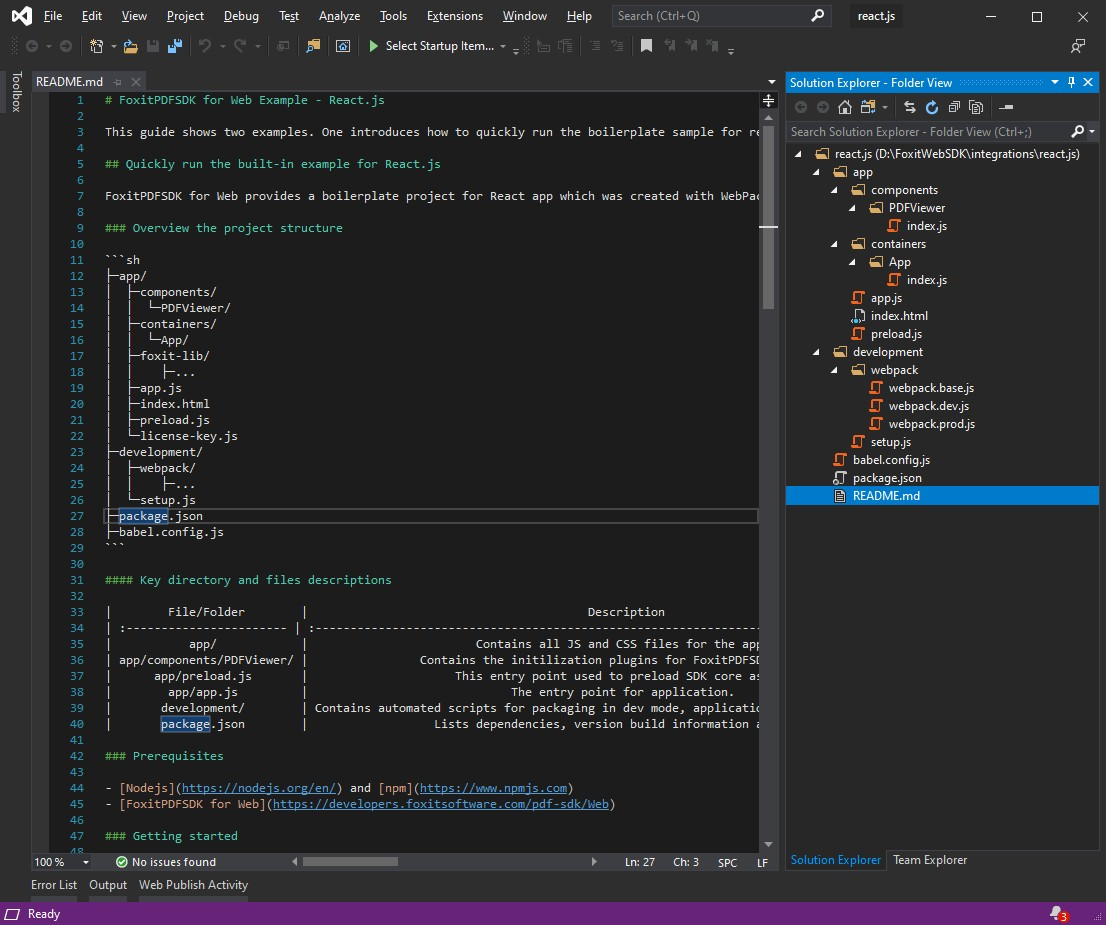
1) Download Foxit PDF SDK For Web. and extract the content.
2) Starting from Version 7.2, Foxit PDF SDK For Web provides a sample for react.js under the “integrations\react.js” folder. The README.md file contains information on how to use the boilerplate.
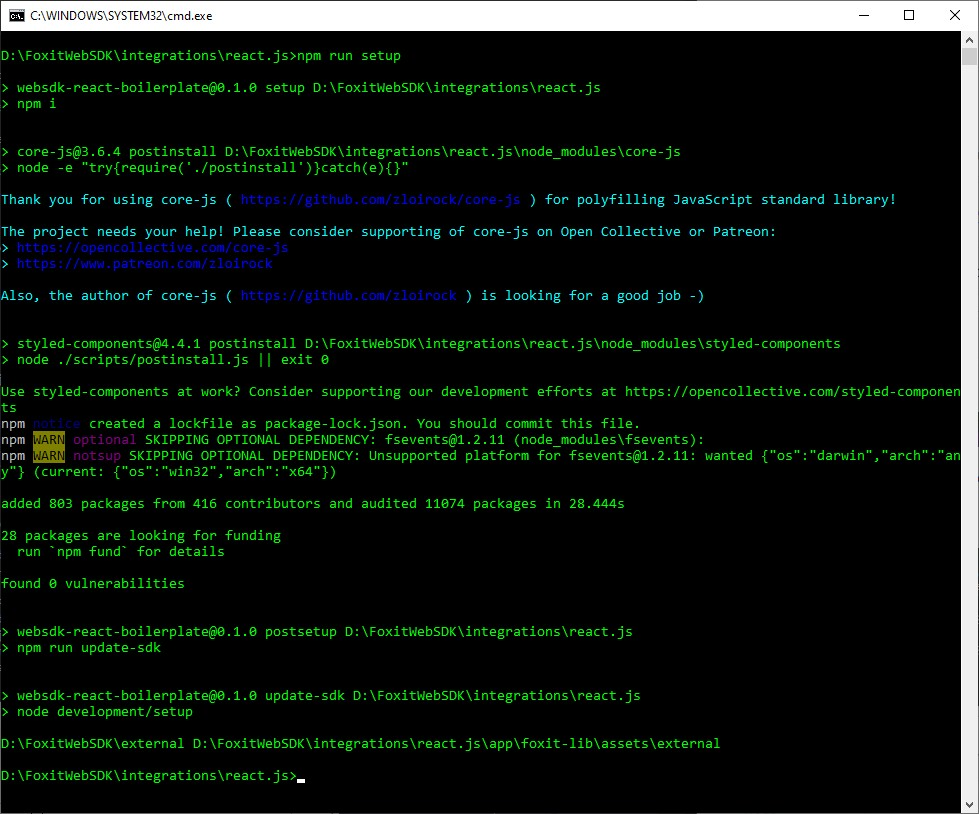
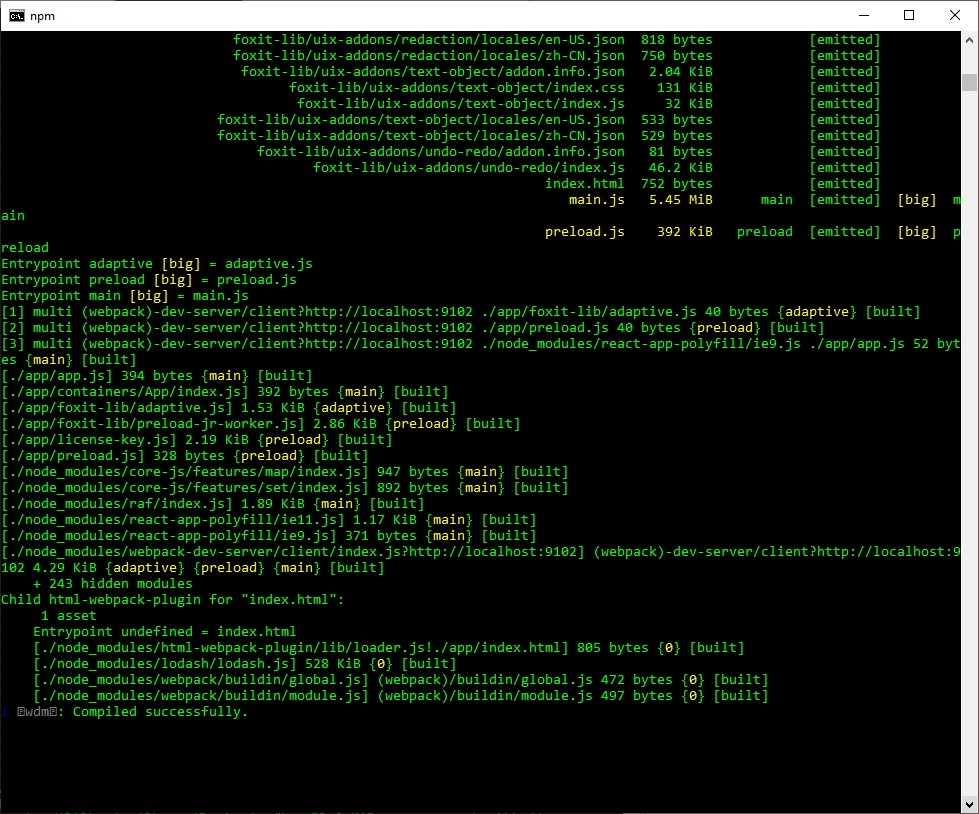
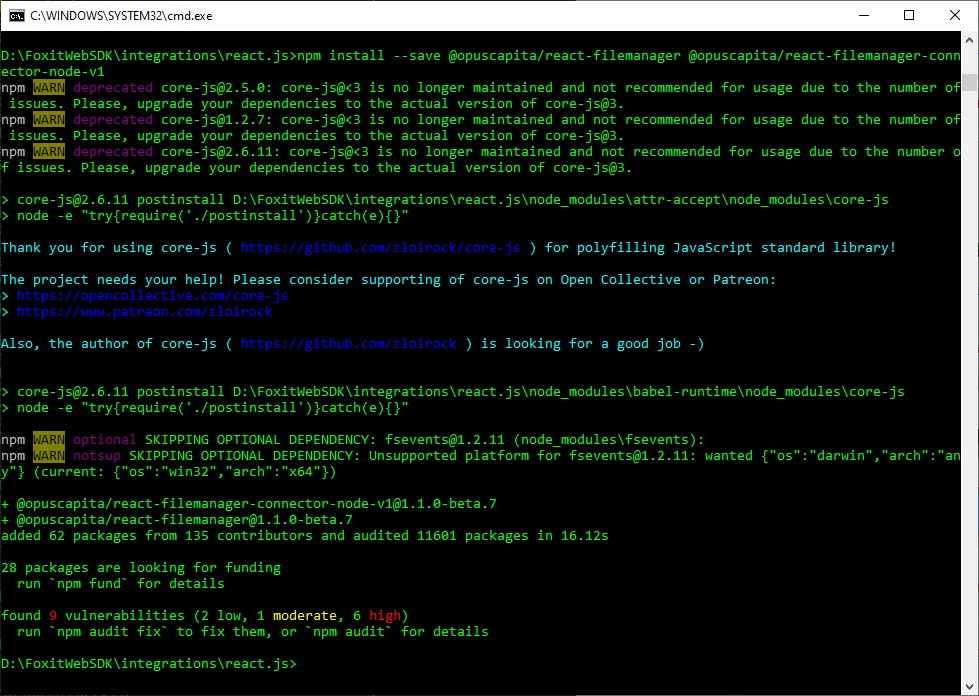
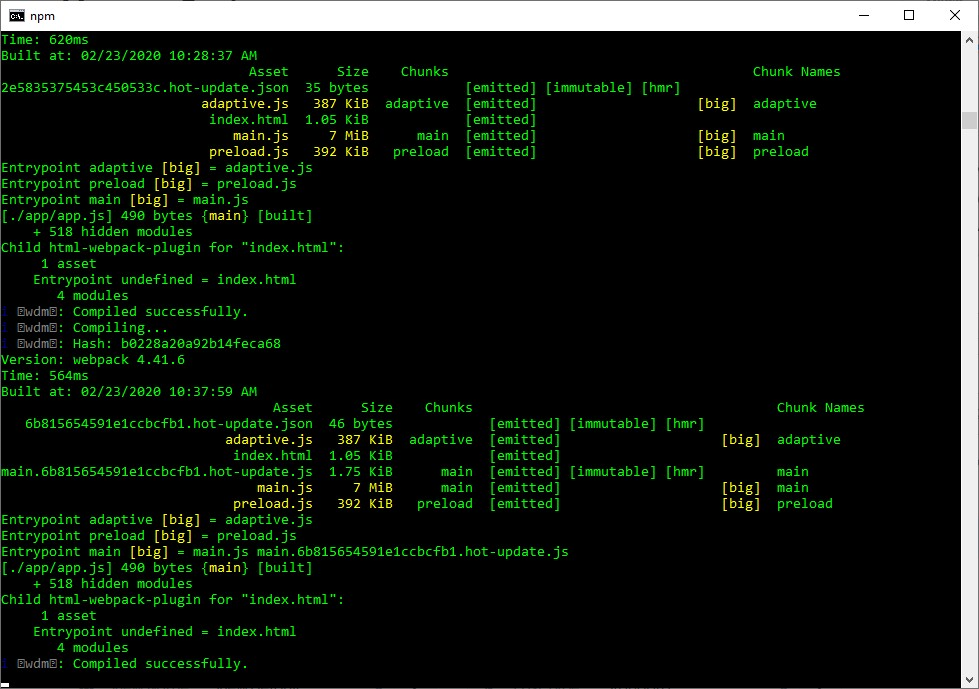
3) Go to the command prompt and change directory to the “integration\react.js” folder. Then type the below and press enter. Then wait for the setup to complete, as in the screenshot below.
npm run setup
4) Then run below command to start the application:
npm start
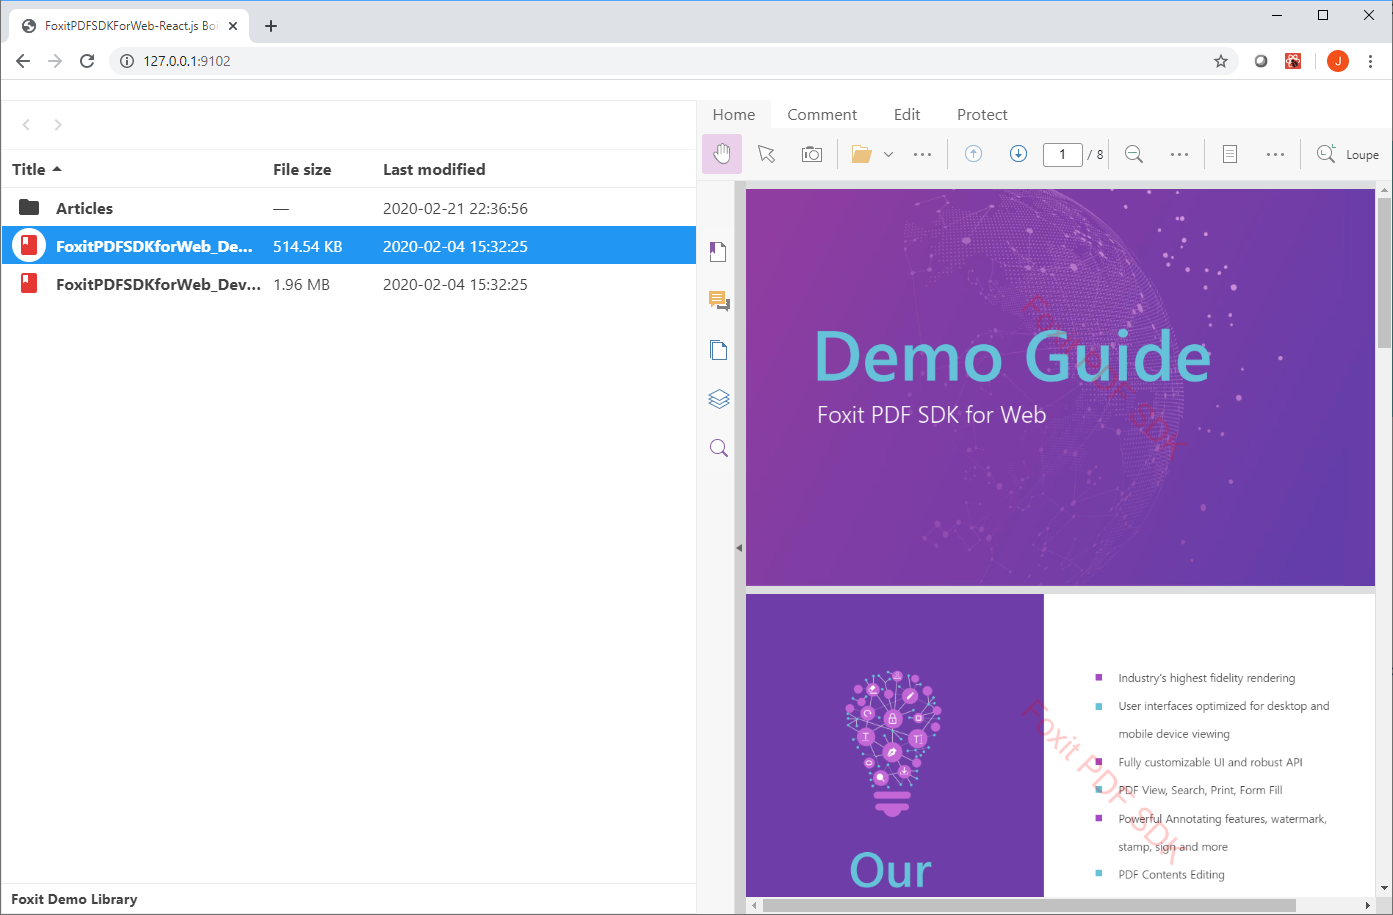
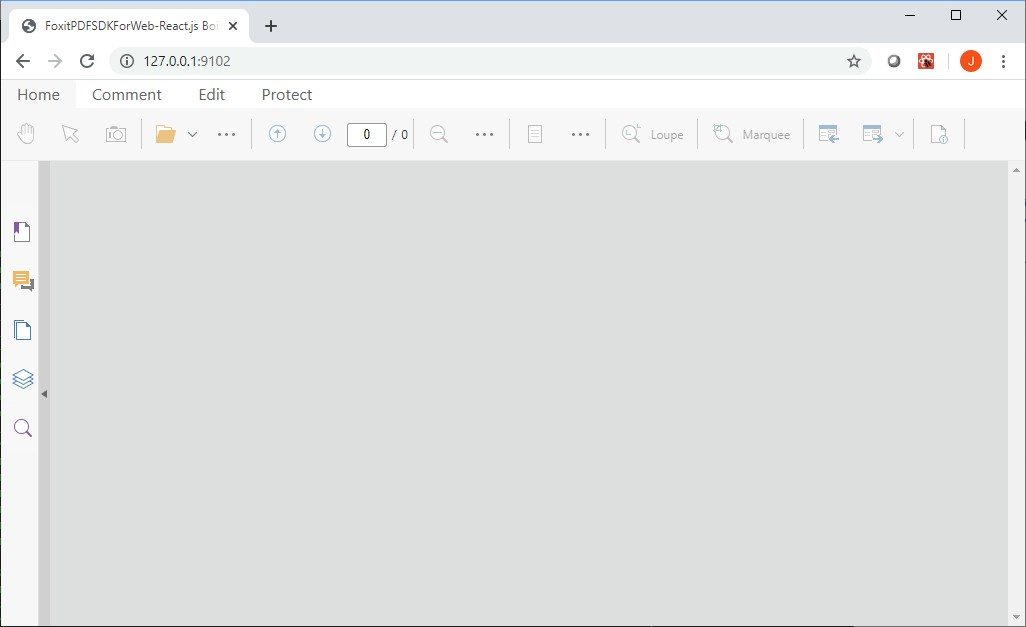
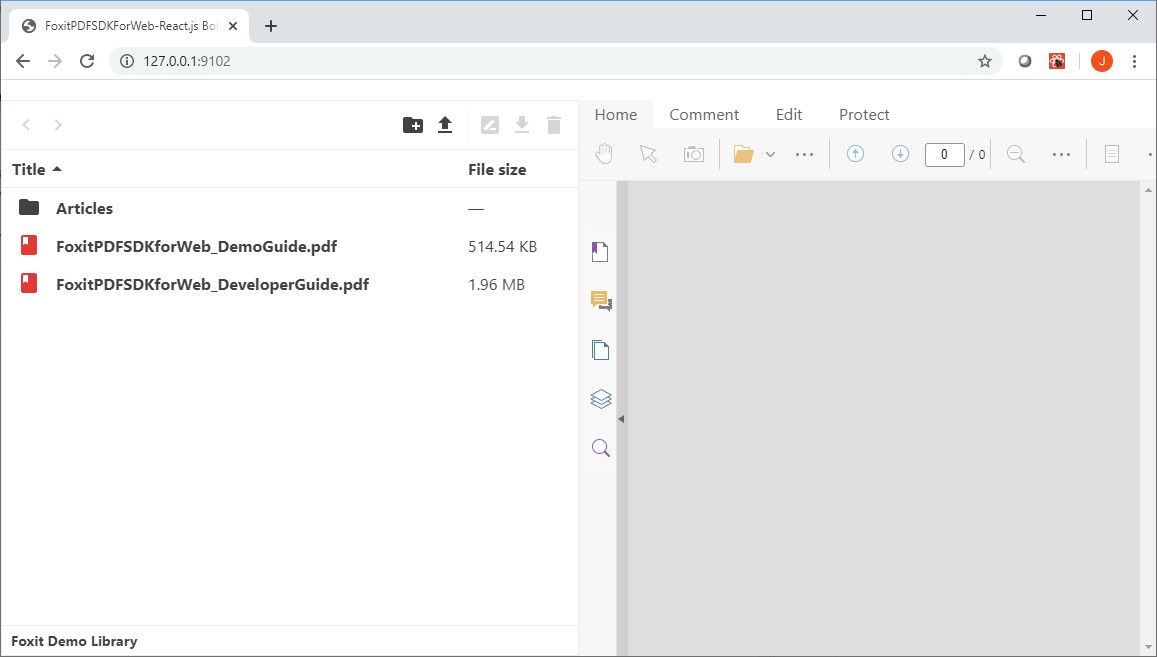
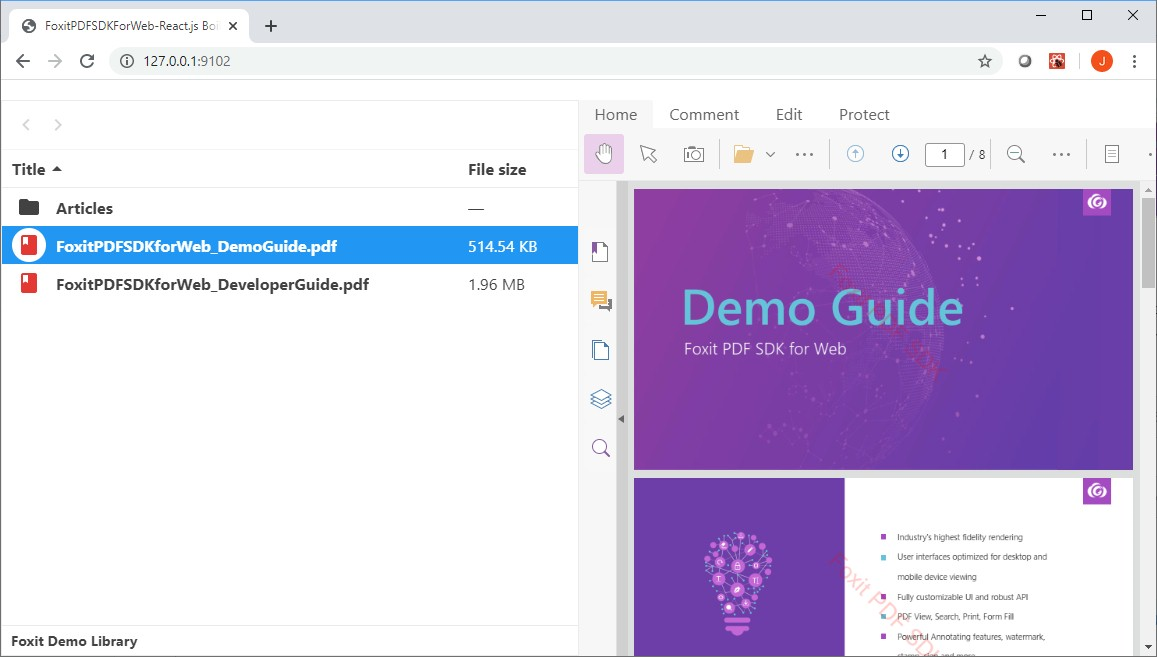
5) You can now open a web browser and enter the following URL. The web page shows a fully featured Foxit PDF Web viewer and editor. You can check open to select a local PDF file and try different features of the Web viewer and editor.
http://127.0.0.1:9102/
B. Setup File Manager Server API
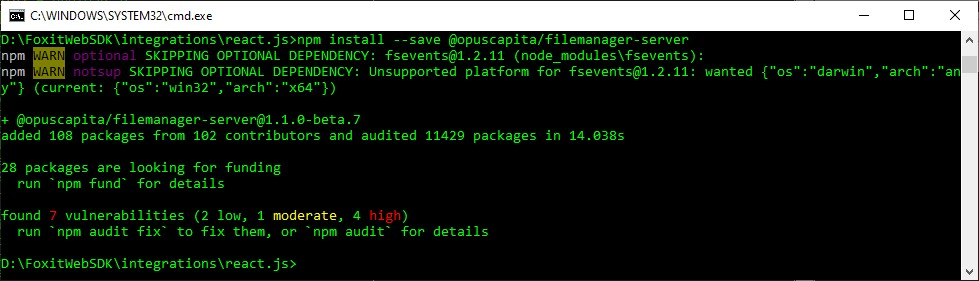
We are going to add a filemanager (by -OpusCapita) component for navigating PDF files stored in folders and sub-folders. Enter the following in the command prompt to install the Server Node API.
npm install --save @opuscapita/filemanager-server
NOTE: we are hosting the File Server on the same server running the Foxit PDF SDK for Web viewer application. However, you can choose to run the File Server on another computer storing the PDF document library. In this article, we are going to use two different server instances on the same computer running on different ports.
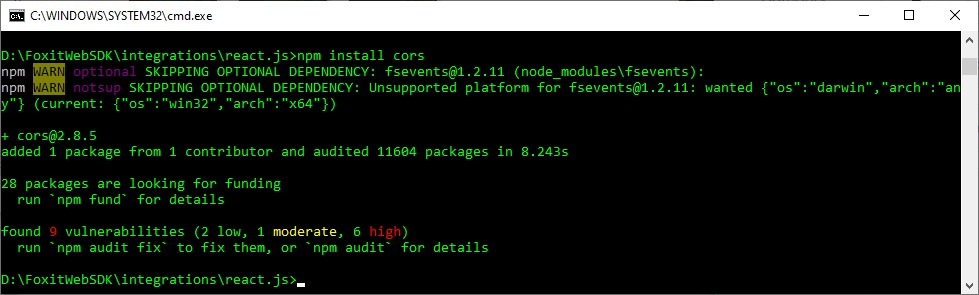
2) As we are going to run two servers and have Foxit Web Viewer to load the PDF file from the File Server, we will need to install the following CORS component to simplify the cross-origin resource sharing (CORS) configuration.
npm install cors
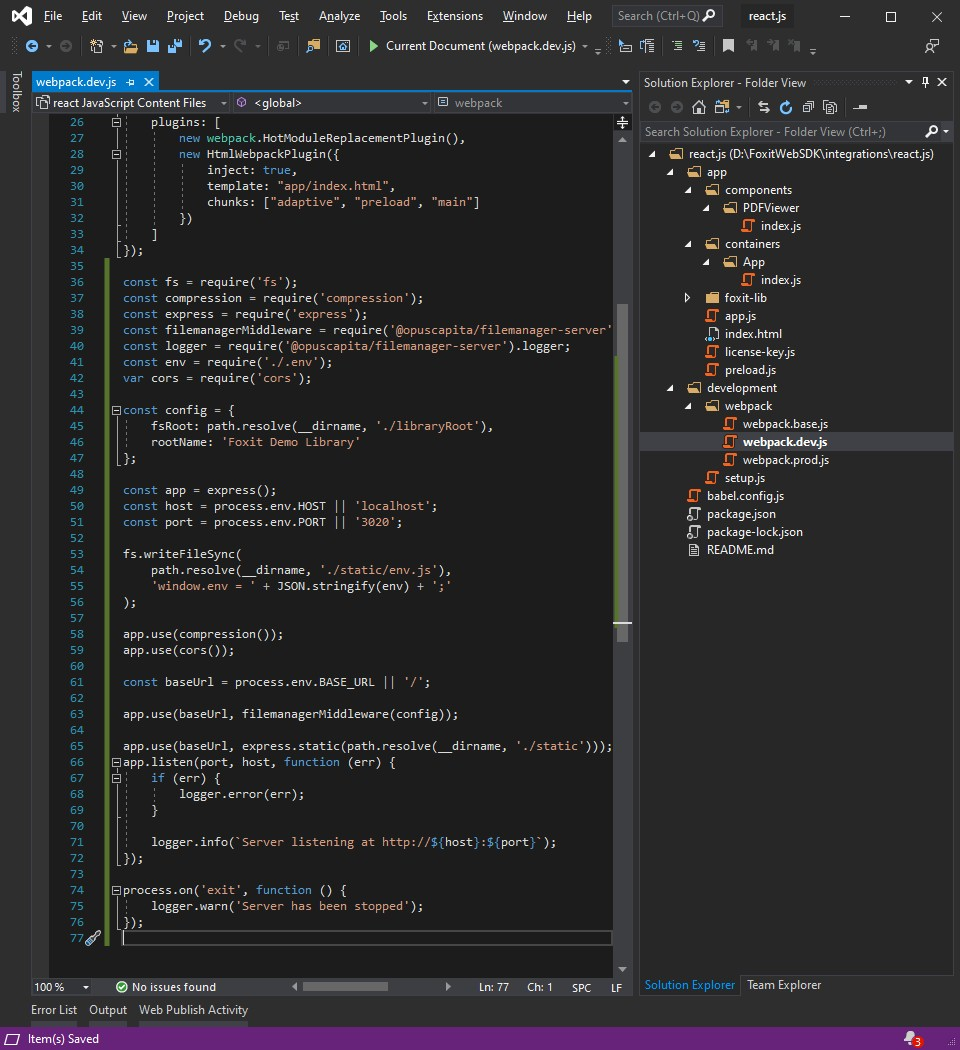
3) Open “development\webpack\webpack.dev.js” to add configuration to run the File Manager Server API. The existing code hosts the Foxit Web Viewer on port 9102. Let’s append the following code of the File Server:
const fs = require('fs');
const compression = require('compression');
const express = require('express');
const filemanagerMiddleware = require('@opuscapita/filemanager-server').middleware;
const logger = require('@opuscapita/filemanager-server').logger;
const env = require('./.env');
var cors = require('cors');

const config = {
    fsRoot: path.resolve(__dirname, './libraryRoot'),
    rootName: 'Foxit Demo Library'
};

const app = express();
const host = process.env.HOST || 'localhost';
const port = process.env.PORT || '3020';

fs.writeFileSync(
    path.resolve(__dirname, './static/env.js'),
    'window.env = ' + JSON.stringify(env) + ';'
);

app.use(compression());
app.use(cors());

const baseUrl = process.env.BASE_URL || '/';

app.use(baseUrl, filemanagerMiddleware(config));

app.use(baseUrl, express.static(path.resolve(__dirname, './static')));
app.listen(port, host, function (err) {
    if (err) {
        logger.error(err);
    }

    logger.info(`Server listening at http://${host}:${port}`);
});

process.on('exit', function () {
    logger.warn('Server has been stopped');
});
4) The code in the previous step set up the root folder, named the File Server, created a configuration file to stores the environment information, and set up and ran the ExpressJS server. In this step, we will have to create an environment module code file.
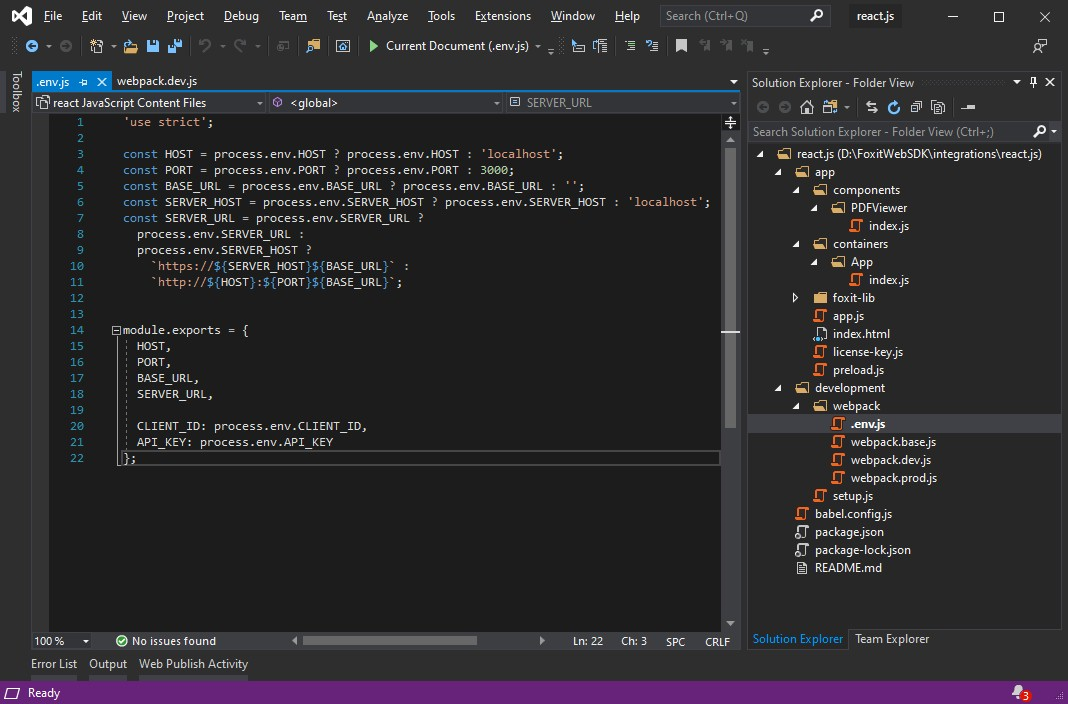
Create a JavaScript file “.env.js” in folder “development\webpack” and store the following code to return the environment information:
'use strict';

const HOST = process.env.HOST ? process.env.HOST : 'localhost';
const PORT = process.env.PORT ? process.env.PORT : 3000;
const BASE_URL = process.env.BASE_URL ? process.env.BASE_URL : '';
const SERVER_HOST = process.env.SERVER_HOST ? process.env.SERVER_HOST : 'localhost';
const SERVER_URL = process.env.SERVER_URL ?
  process.env.SERVER_URL :
  process.env.SERVER_HOST ?
    `https://${SERVER_HOST}${BASE_URL}` :
    `http://${HOST}:${PORT}${BASE_URL}`;

module.exports = {
  HOST,
  PORT,
  BASE_URL,
  SERVER_URL,

  CLIENT_ID: process.env.CLIENT_ID,
  API_KEY: process.env.API_KEY
};
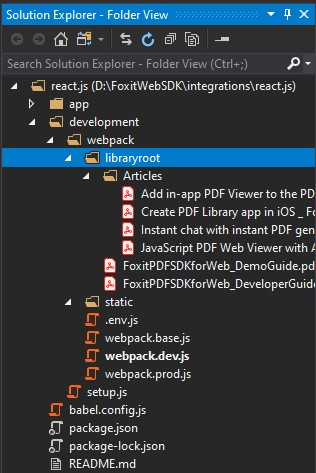
5) Next, we are going to create two folders under “development\webpack”. The “static” folder will stores the generated env.js file and we can leave it empty. The “libraryRoot” folder will store folders and sub-folders to house PDF documents.
NOTE: In a production environment, we should set the configuration variable “fsRoot” to refer to the folder where we want to share the document. For the purpose of this article, we just put it under the webpack folder.
6) After setting up the File Manager API Server, we should run the below command to test if the settings and file/folder are set properly.
npm start
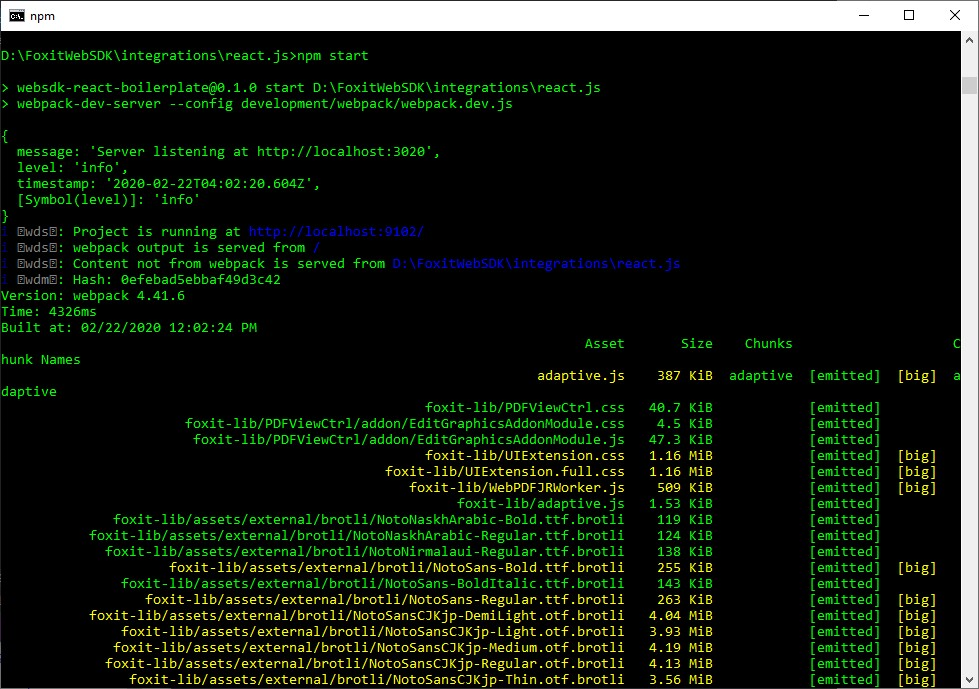
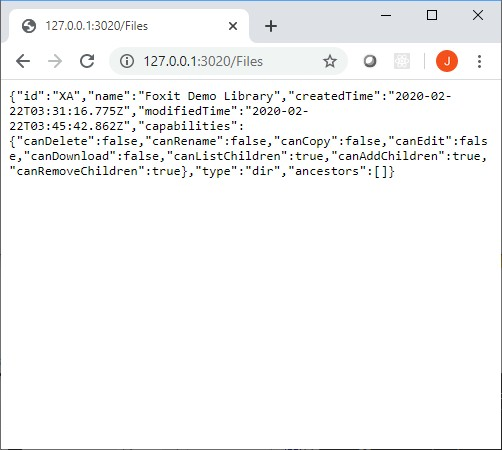
Now the server is up. As you can see from above, the server is listening at port 3020. Let’s try one of the APIs to get the meta information of the File Server root.
http://127.0.0.1:3020/Files
Even though we haven’t changed any code, we should also try to visit http://127.0.0.1:9102/ to make sure the original Foxit Web Viewer website is running properly.
C. Adding React File Manager for PDF Library
In the previous section, we added the File Server Node API component from filemanager (by -OpusCapita). In this section, we are going to add the Client React component from OpusCapita for navigating the folders and listing the files in our PDF library.
1) Run the following command to install the File Manager client component that interacts with the Server API and renders the user interface.
npm install --save @opuscapita/react-filemanager @opuscapita/react-filemanager-connector-node-v1
2) Add the File Manager Client React component on the left hand side of the Foxit PDF Web Viewer. Open app\index.html and add the css to split the screen into half.
        .split {
            height: 100%;
            width: 50%;
            position: fixed;
            z-index: 1;
            top: 0;
            overflow-x: hidden;
            padding-top: 20px;
        }
        .left {
            left: 0;
        }
        .right {
            right: 0;
        }

3) As standard, React renders the PDF Web Viewer’s container component to the “app” div in index.html. We are going to define a new component “DocLibrary” which will contain both the File Manager component and the PDF Web Viewer component. With this new DocLibrary component, React can help transfer the information of the selected PDF file from the File Manager to the PDF Web Viewer for rendering. We will render this DocLibrary component to the app div instead.
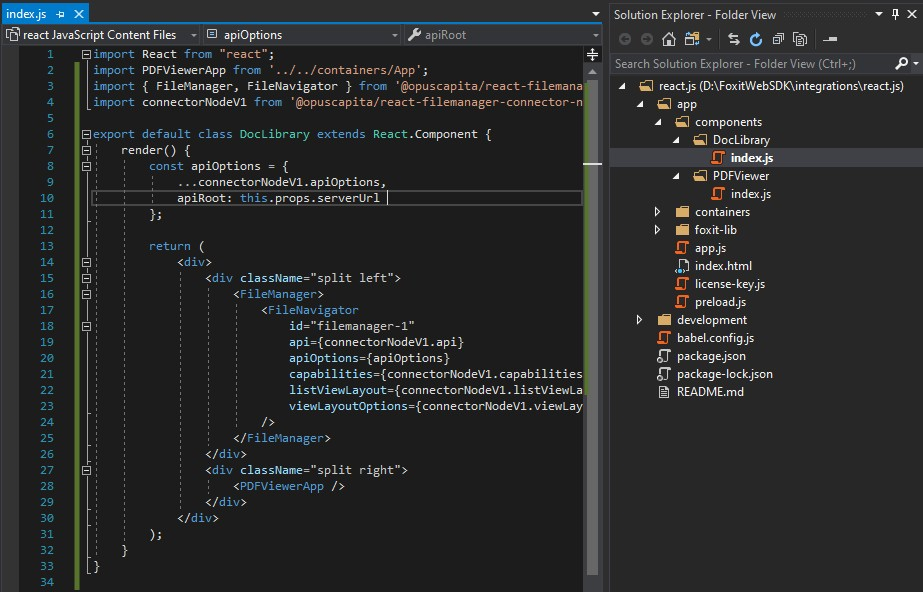
To add this new “DocLibrary” component, let’s add a new folder “DocLibrary” under folder “app\components”. Then we add a JavaScript file “index.js”. Then we add the following code:
import React from "react";
import PDFViewerApp from '../../containers/App';
import { FileManager, FileNavigator } from '@opuscapita/react-filemanager';
import connectorNodeV1 from '@opuscapita/react-filemanager-connector-node-v1';

export default class DocLibrary extends React.Component {
    render() {
        const apiOptions = {
            ...connectorNodeV1.apiOptions,
            apiRoot: this.props.serverUrl
        };

        return (
            <div>
                <div className="split left">
                    <FileManager>
                        <FileNavigator
                            id="filemanager-1"
                            api={connectorNodeV1.api}
                            apiOptions={apiOptions}
                            capabilities={connectorNodeV1.capabilities}
                            listViewLayout={connectorNodeV1.listViewLayout}
                            viewLayoutOptions={connectorNodeV1.viewLayoutOptions}
                        />
                    </FileManager>
                </div>
                <div className="split right">
                    <PDFViewerApp />
                </div>
            </div>
        );
    }
}
The above code embeds the File Manager, its File Navigator component and the PDFViewer container. We passed the File Server API information as one of the parameters. As we don’t want to hardcode the information, here we are expecting a property “serverUrl” to be provided.
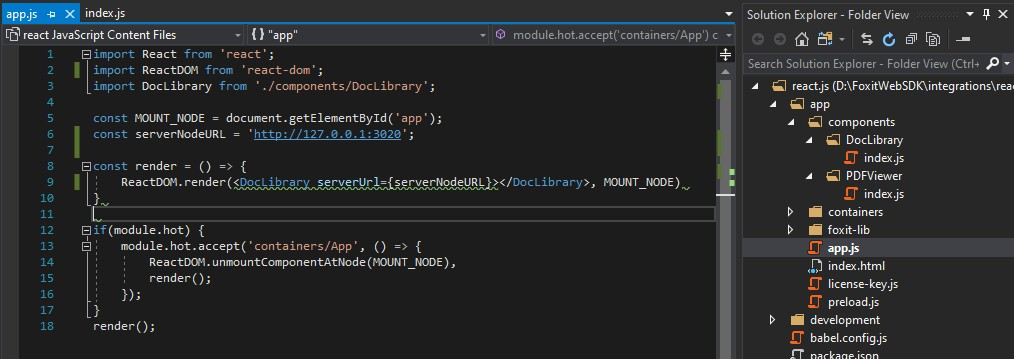
4) Next, we are going update the “app” div. Open “app\app.js” file. Here we add a line to import the DocLibrary component, define a constant to store File Server API URL, and update to render the DocLibrary component instead of the App.
...
import DocLibrary from './components/DocLibrary';

const MOUNT_NODE = document.getElementById('app');
const serverNodeURL = 'http://127.0.0.1:3020';

const render = () => {
    ReactDOM.render(<DocLibrary serverUrl={serverNodeURL}></DocLibrary>, MOUNT_NODE)
}
...
The resulting code is as below:
After updating app.js, the npm will re-compile itself.
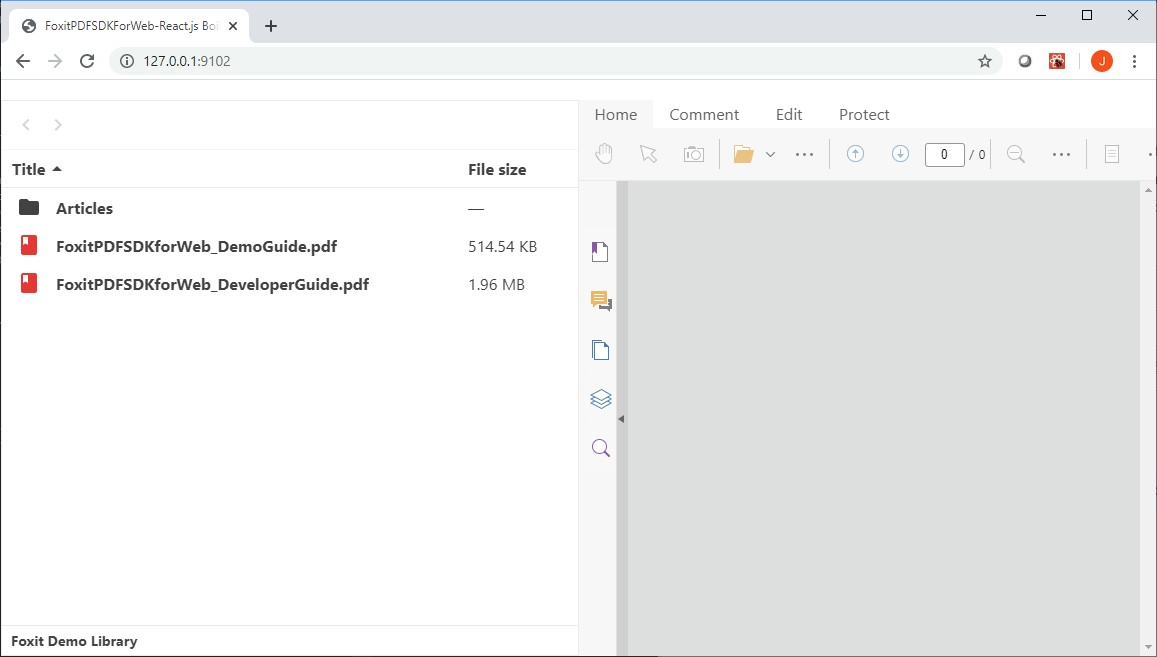
Next, the web browser will refresh itself to show the updated rendering result:
You can double click the folder to list the contents inside and then press the “back” (left arrow) button to go back to the upper level.
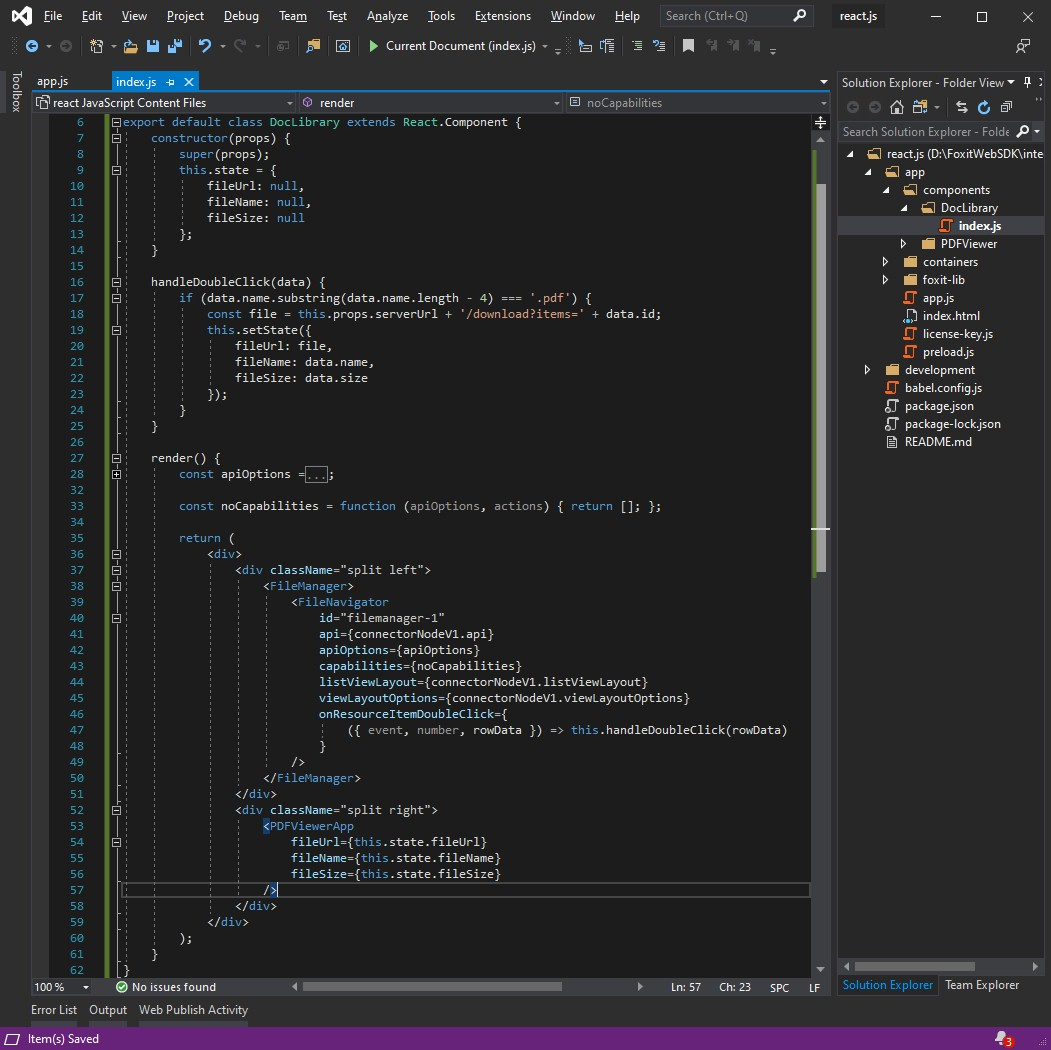
5) The File Manager component provides a toolbar to allow creating a subfolder, uploading files, deleting and renaming files, etc. Let’s make a small change to disable these capabilities. Open “app\components\DocLibrary\index.js” and add a new function that takes two parameters and returns an empty array, like below:
const noCapabilities = function (apiOptions, actions) { return []; };
We then pass this function to the FileNavigator’s capabilities properties:
<FileManager>
    <FileNavigator
       id="filemanager-1"
       api={connectorNodeV1.api}
       apiOptions={apiOptions}
       capabilities={noCapabilities}
       listViewLayout={connectorNodeV1.listViewLayout}
       viewLayoutOptions={connectorNodeV1.viewLayoutOptions}
    />
</FileManager>
Now the web browser doesn’t render the file management features in the File Manager component.
6) Even though the user interface doesn’t provide toolbar buttons, it doesn’t mean the File Manager API doesn’t accept file upload and other operations. Open “development\webpack\webpack.dev.js” and add a “readonly” property to the config object for initialing the File Manager API to accept only read-only operations.
const config = {
    fsRoot: path.resolve(__dirname, './libraryRoot'),
    readOnly: true,
    rootName: 'Foxit Demo Library'
};
D. Add Interactions in DocLibrary Component
We now have the DocLibrary component in place but the File Manager and its File Navigator component are not interacting with Foxit Web SDK’s PDFViewer component. In this section, we are going to add the interaction.
1) Open “app\components\DocLibrary\index.js”. Add a property to FileNavigator and pass it the function we use to handle the double click event which will fire when users double click a file, like below:
<FileManager>
    <FileNavigator
        id="filemanager-1"
        api={connectorNodeV1.api}
        apiOptions={apiOptions}
        capabilities={noCapabilities}
        listViewLayout={connectorNodeV1.listViewLayout}
        viewLayoutOptions={connectorNodeV1.viewLayoutOptions}
        onResourceItemDoubleClick={
             ({ event, number, rowData }) => this.handleDoubleClick(rowData)
        }
    />
</FileManager>
2) We would like to store the metadata of the file double-clicked by user as stated. This includes the file name, the file size and the API (a URL) to download the file. Storing this information in states allows the React framework to help update corresponding components which rely on these states. Let’s add the states in the constructor of the DocLibrary component.
    constructor(props) {
        super(props);
        this.state = {
            fileUrl: null,
            fileName: null,
            fileSize: null
        };
    }
3) Next, we are going to provide an implementation of the handleDoubleClick function. In this function, we are going to make sure the file has a “.pdf” extension. Then we compose the URL which is the API to retrieve the content of the PDF file and set the states.
    handleDoubleClick(data) {
        if (data.name.substring(data.name.length - 4) === '.pdf') {
            const file = this.props.serverUrl + '/download?items=' + data.id;
            this.setState({
                fileUrl: file,
                fileName: data.name,
                fileSize: data.size
            });
        }
    }
4) We now have the states, we then pass this information to the PDFViewerApp container component.
<PDFViewerApp
   fileUrl={this.state.fileUrl}
   fileName={this.state.fileName}
   fileSize={this.state.fileSize}
/>
The resulting DocLibrary code is like below:
5) Next, we are going to update the PDFViewer container function component. We pass the props as a parameter and then pass along the property values to the PDFViewer component, like below:
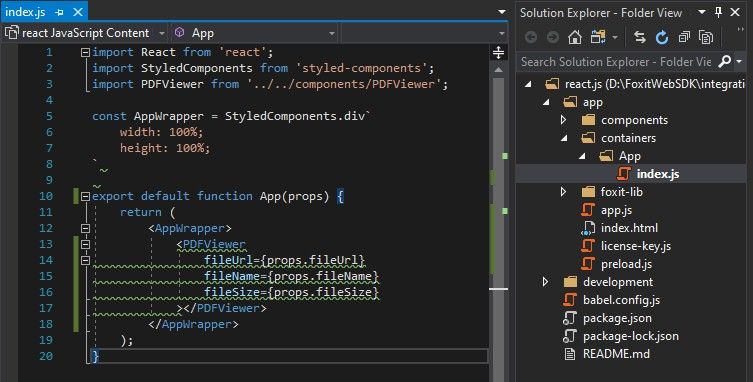
export default function App(props) {
    return (
        <AppWrapper>
            <PDFViewer
                fileUrl={props.fileUrl}
                fileName={props.fileName}
                fileSize={props.fileSize}
            ></PDFViewer>
        </AppWrapper>
    );
}
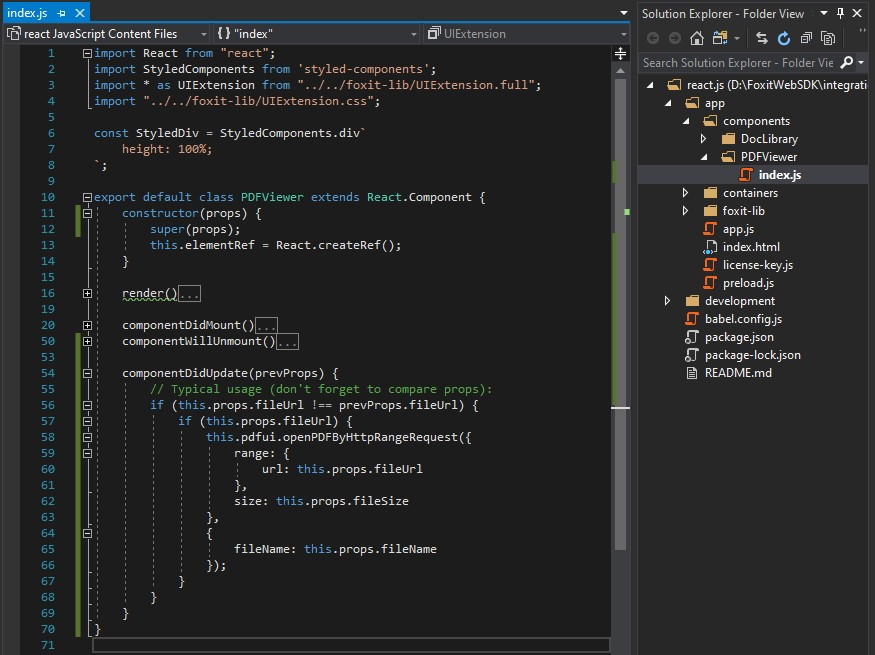
6) Then, we are going to modify the PDFViewer React component to make use of the file metadata. Open “app\components\PDFViewrer\index.js”. First, we modify the constructor to pass along the props.
    constructor(props) {
        super(props);
        this.elementRef = React.createRef();
    }
7) Finally, we are going to implement a React lifecycle function componentDidUpdate and ask the pdfui, the UI extension of the PDFViewer instance, to get a copy of the PDF file.
    componentDidUpdate(prevProps) {
        // Typical usage (don't forget to compare props):
        if (this.props.fileUrl !== prevProps.fileUrl) {
            if (this.props.fileUrl) {
                this.pdfui.openPDFByHttpRangeRequest({
                    range: {
                        url: this.props.fileUrl,
                    },
                    size: this.props.fileSize
                },
                {
                    fileName: this.props.fileName
                });
            }
        }
}
The resulting PDFViewer React component looks like below:
Now, you can double click a file in the File Manager component in the web browser and the PDF file will show in the PDF Web Viewer component.
 In this article, we implemented a PDF document library React web application with the React boilerplate sample provided in Foxit Web SDK 7.2.
Updated on August 16, 2021